
You know that feeling when you walk into your kitchen and everything just feels… tired? The cabinets are fine, technically. They’re not falling apart or anything. But they’re also not sparking any joy when you’re making your morning coffee. Here’s the thing: you don’t need to gut your entire kitchen to fall back in love with it. A full renovation costs tens of thousands of dollars and weeks of living without a functional kitchen. But a cabinet refresh? That’s the sweet spot where big visual impact meets actually-doable budget and timeline. I’m talking about the kind of updates that make your neighbors ask if you renovated. Paint transformations that look custom. Hardware swaps that feel like jewelry for your cabinets. Small changes that completely shift the vibe of the room. Let’s get into it.
The Two-Tone Cabinet Transformation

Painting your lower cabinets a different color than your uppers is like giving your kitchen a personality transplant. It breaks up the visual monotony and creates this gorgeous depth that all-one-color cabinets just can’t match. Navy lowers with white uppers? Classic and sophisticated. Forest green on the bottom with cream on top? Suddenly your kitchen feels like a European cafe. The contrast draws your eye around the room instead of letting everything blur together into one big beige blob. The best part is you can test this without committing to the whole kitchen at once. Start with your island or lower cabinets, live with it for a week, and see how you feel. Most people end up wishing they’d done it sooner because the difference is that dramatic. Just make sure your two colors share an undertone — both warm or both cool — so they feel intentional instead of random.
Pro Tip: Paint your lower cabinets the darker color so any scuffs or dirt are less visible down where feet and bags tend to bump into things.
Hardware as Jewelry: The Quick Swap
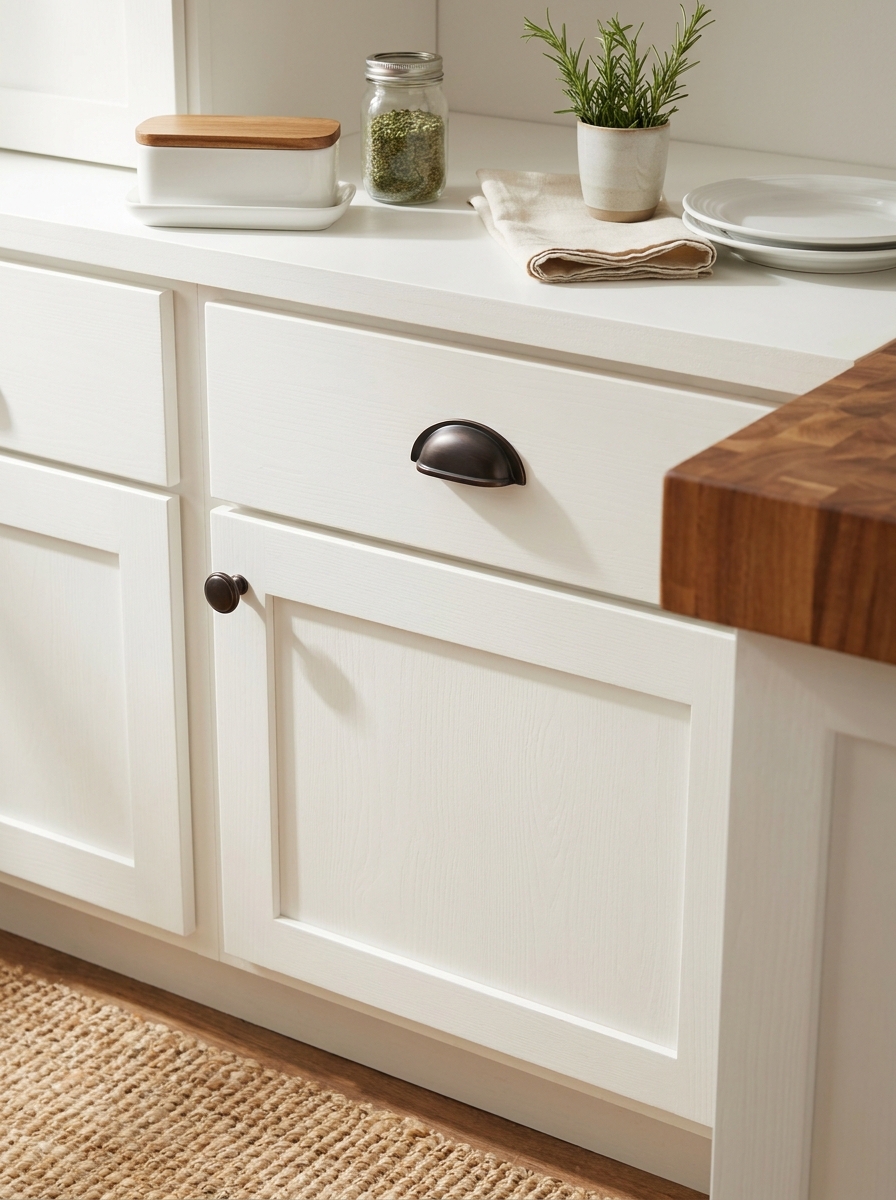
If painting feels like too much commitment, start with hardware. I’m serious — new cabinet pulls and knobs are the fastest way to make your kitchen look expensive. Those builder-grade brushed nickel pulls from 2008? They’re dating your entire kitchen. Swap them for brass, matte black, or even leather pulls, and suddenly your cabinets look custom. It’s like putting on the right earrings with an outfit — same dress, completely different vibe. You can do this in an afternoon with just a screwdriver. Most hardware uses standard spacing, so you won’t even need to drill new holes. And if you’re renting or not ready to commit, you can always change them back. The impact-to-effort ratio here is absolutely unbeatable. I’ve seen kitchens that looked builder-basic transform into something magazine-worthy just from a hardware upgrade and nothing else.
Pro Tip: Mix knobs on doors with pulls on drawers instead of using all one style — it adds visual interest and makes your kitchen feel more custom and collected.
Open Shelving: Remove Doors for an Airy Feel

Sometimes the best remodel is subtraction. Taking doors off a few upper cabinets creates instant breathing room and makes your kitchen feel twice as big. You don’t have to commit to full open shelving everywhere — that’s a lot of dishes to keep pretty all the time. But removing doors from one or two cabinets near a window or on either side of your range? That’s the sweet spot. It breaks up the wall of cabinet doors and gives you a chance to display your pretty dishes instead of hiding them. The trick is styling them right so they don’t look messy. Stick to a color palette for what you display — all white dishes, or wood and ceramic, or glass and brass. Group things in odd numbers. Leave some empty space. And be honest about whether you’ll actually keep it looking good, because open shelves show everything. But when it works, it makes your whole kitchen feel more collected and personal instead of cookie-cutter contractor-grade.
Pro Tip: Paint the inside of the cabinet a contrasting color before removing the doors — a soft sage or navy backing makes your white dishes pop and looks incredibly intentional.
The Power of Paint: Choosing the Right Finish

Let’s talk about paint, because not all cabinet paint is created equal. You need something durable that won’t chip every time you bump it with a pot, but also something that looks smooth and professional, not brushstroke-y. Satin or semi-gloss finishes are your friends here. They’re wipeable, they reflect light beautifully, and they hide minor imperfections better than flat paint. Matte cabinet paint exists, and it photographs gorgeously, but it shows every fingerprint and splash. Save yourself the frustration and go with a slight sheen. Color-wise, test your samples in your actual kitchen light. That perfect greige you loved at the store might look purple in your north-facing kitchen, or that crisp white might read too stark under your warm evening lights. Paint giant swatches on poster board and live with them for a few days. Look at them in morning light, afternoon light, and under your pendant lights at night. The right color will make your cabinets look expensive. The wrong one will make you wish you’d tested longer.
Pro Tip: Paint your samples on white poster board and move them around to different cabinet locations throughout the day — colors look completely different on uppers versus lowers and near windows versus interior walls.
Glass Inserts: Let Your Pretty Dishes Shine

Here’s a secret that makes your kitchen feel custom without the custom price tag: swap out a few solid cabinet doors for glass-front ones. It instantly adds visual interest and breaks up that sea of solid doors. I love doing this on upper cabinets flanking a window or above a sink. You’re creating little display moments that make your kitchen feel collected and personal. And honestly? It forces you to keep those shelves styled, which means you’ll actually use your pretty dishes instead of hiding them. You can buy glass cabinet door inserts at most home improvement stores, or if you’re handy, remove the center panel from existing doors and add glass yourself. Seeded glass, frosted glass, or even wire mesh inserts give you different vibes. I’m partial to clear glass because I’m nosy and I like seeing everything, but frosted glass hides a multitude of sins if you’re not quite ready for full transparency. Either way, this little change makes your kitchen feel so much more expensive and thoughtfully designed.
Pro Tip: Only convert 2-4 cabinet doors to glass fronts — usually the uppers flanking your range hood or sink. Too many glass doors can feel overwhelming and create pressure to keep everything perfect. Strategic placement gives you that designer look while keeping most of your storage private and practical.
Crown Molding Magic: Add Height Without Construction

Want to know what makes builder-grade cabinets look expensive? Crown molding at the top. It’s like giving your cabinets a little hat, and suddenly they look like they belong in a much fancier kitchen. If there’s a gap between your cabinets and ceiling, you can add crown molding to bridge that space and make your cabinets look taller and more custom. Even if your cabinets already touch the ceiling, a simple trim piece along the top edge adds architectural interest that standard cabinets just don’t have. This is surprisingly doable as a DIY project if you’ve got a miter saw and a patient afternoon. You’re basically gluing and nailing decorative trim to the top of your existing cabinets. Paint it the same color as your cabinets for a seamless look, or go bold and paint it your ceiling color to draw the eye up. The whole project might cost you under $200 in materials, but the impact? Thousands of dollars worth of fancy.
Pro Tip: If the gap between your cabinets and ceiling is really large, fill it first with a simple plywood box before adding crown molding. This creates a built-in look and gives you a solid surface to attach your trim. Paint everything the same color and nobody will ever know it wasn’t original.
Under-Cabinet Lighting: The Glow-Up Your Kitchen Needs
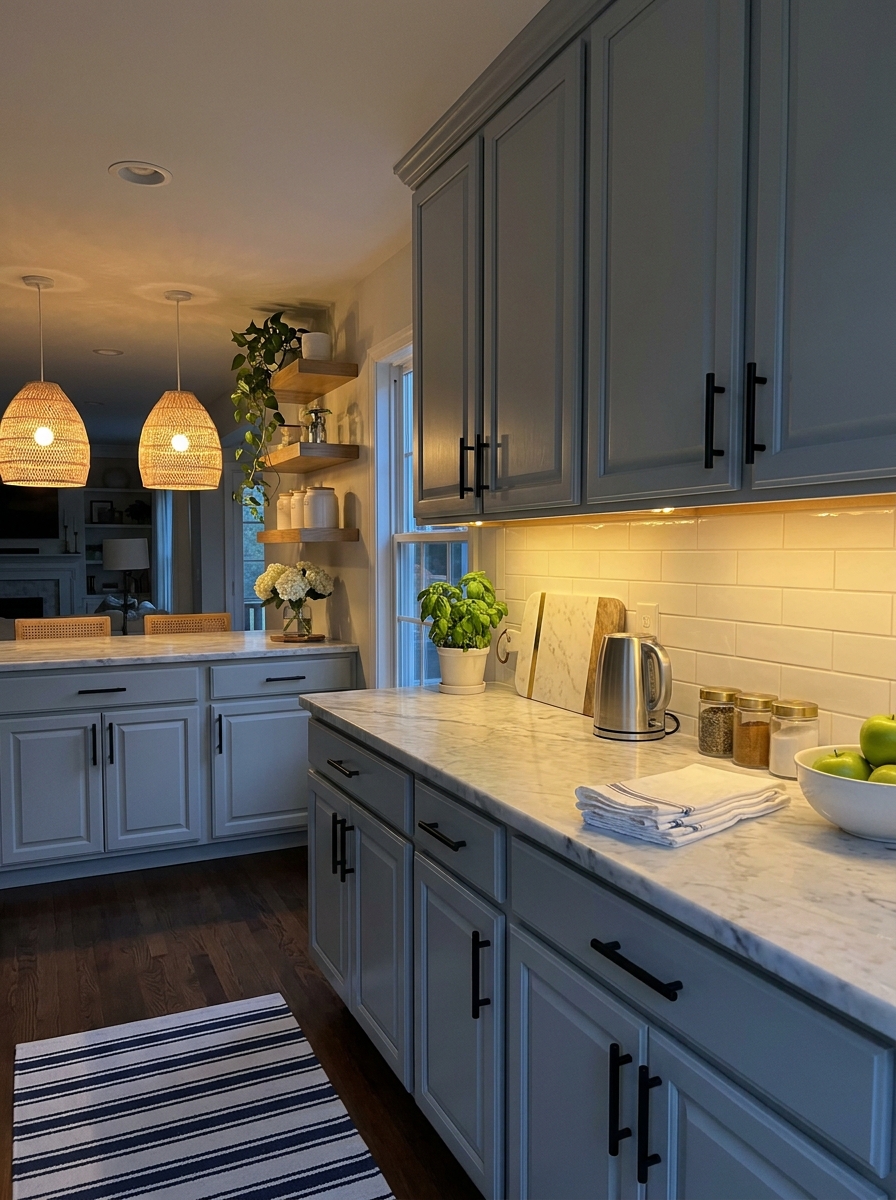
Let’s talk about the upgrade nobody sees coming but everyone notices: under-cabinet lighting. It completely changes how your kitchen feels at night, and it makes your countertops actually usable after dark. I’m obsessed with LED strip lights or puck lights tucked under upper cabinets. They wash your backsplash and counters in this beautiful ambient glow that makes everything look more expensive. Suddenly your tile backsplash has dimension, your countertops gleam, and your whole kitchen feels like a boutique hotel. The best part? Modern under-cabinet lights are plug-in or battery-operated, so you don’t need an electrician. Stick-on LED strips take literally fifteen minutes to install. You peel, stick, and plug in. Some even come with remotes so you can dim them or change the color temperature. Warm white makes your kitchen cozy, while bright white makes it feel crisp and clean. This tiny change makes your cabinets look more custom because it adds that layer of thoughtful lighting that builder-grade kitchens never have.
Pro Tip: Install your under-cabinet lights toward the front edge of the cabinet, not the back. This prevents shadows on your countertop and gives you better task lighting. If you can see the light strip itself when standing at the counter, you’ve mounted it too far forward — tuck it back just enough that it’s hidden but still effective.
Cabinet Liner Surprise: The Inside Counts Too

Okay, hear me out on this one. Nobody talks about the inside of cabinets, but every single time you open a door, you see it. And if it’s that dingy builder-grade white laminate with mysterious stains from 1987, it’s not sparking joy. Peel-and-stick cabinet liner is stupid cheap and wildly satisfying to install. I’m talking marble-look, wood-grain, or even fun patterns. It takes an afternoon, costs maybe fifty bucks, and suddenly opening your cabinets feels like a little gift. It’s the ultimate secret upgrade that makes you smile. This is especially smart if you’ve got glass-front cabinets or open shelving, because now the backs are part of your design. A pretty liner behind your dishes makes everything look more curated. But even in regular closed cabinets, it matters. You’re in your kitchen every day. Why not make every little moment a tiny bit prettier? Plus, it protects your shelves and makes cleaning up spills so much easier. Peel off the old liner, stick down new. Done.
Pro Tip: Measure each shelf individually before cutting your liner — cabinet shelves are rarely perfectly uniform. Cut your liner about a quarter-inch smaller than the shelf on all sides. This prevents curling edges and makes it look professionally installed rather than obviously DIY.
Beadboard Backing: Instant Cottage Charm

Want to add texture and personality without touching your cabinet boxes? Install beadboard or shiplap backing inside your glass-front cabinets or open shelving. This simple addition creates depth and makes your dishes pop like they’re on display in a boutique shop. You can find peel-and-stick beadboard panels at any home improvement store, and they’re ridiculously easy to install. Just measure, cut, stick. Paint them in a contrasting color to your cabinets or go tone-on-tone for subtle sophistication. I’ve seen people use soft sage behind white dishes, navy behind white cabinets, even wallpaper for the truly adventurous. The best part? This trick works whether you have glass doors or you’ve removed doors entirely. It instantly elevates the look from “I took my doors off” to “I planned this whole design.” Your everyday dishes suddenly look curated and intentional, like you hired a stylist to arrange your cereal bowls.
Pro Tip: Paint your beadboard backing before installation, it’s way easier than trying to cut in around your shelves. Let it dry completely, then stick it up. Game changer for a clean finish.
Toe-Kick Transformation: The Detail Nobody Notices Until You Fix It

Here’s something nobody talks about but everyone sees: that scuffed, dinged-up toe-kick at the bottom of your cabinets. It’s taken years of abuse from shoes, mops, and vacuum cleaners, and it’s probably looking rough. Painting or replacing it is one of those tiny changes that makes your whole kitchen look more polished. If your toe-kick is wood, sand it down and paint it to match your cabinets or go bold with a contrasting color. Black toe-kicks under white cabinets? Chef’s kiss. If it’s damaged beyond repair, you can replace it with new wood or even tile it to match your floor. Some people are installing metal toe-kicks now for that industrial edge. This is genuinely one of the easiest updates you can make, but the visual impact is wild. Your kitchen suddenly looks finished and intentional, like someone actually thought about every detail. Because you did.
Pro Tip: Use porch and floor enamel paint for toe-kicks instead of regular wall paint. It’s made to withstand foot traffic and won’t chip every time someone kicks it with their shoe.
Magnetic Spice Rack Inside Doors: Hidden Organization Gold

The inside of your cabinet doors is prime real estate you’re probably wasting. Install magnetic strips or small racks inside your upper cabinet doors and suddenly you’ve got storage for spices, measuring spoons, pot lids, or anything else that’s cluttering your counters. This is especially genius for spices because you can see everything at a glance instead of digging through a dark cabinet. Attach magnetic tins to a metal strip, or install those slim wire racks designed specifically for cabinet doors. You can find them at any organizing store, and installation takes about ten minutes with a screwdriver. What I love about this trick is that it’s completely invisible when your cabinets are closed, but it makes your kitchen so much more functional. You’re using dead space and clearing counter clutter at the same time. It’s the kind of smart organization that makes you feel like you’ve got your life together, even if you’re eating cereal for dinner.
Pro Tip: Measure the clearance between your cabinet door and the shelf before installing anything. You need at least an inch of space so your new rack doesn’t hit the shelf when you close the door. Trust me on this one.
Decorative Corner Brackets: Victorian Charm Made Easy
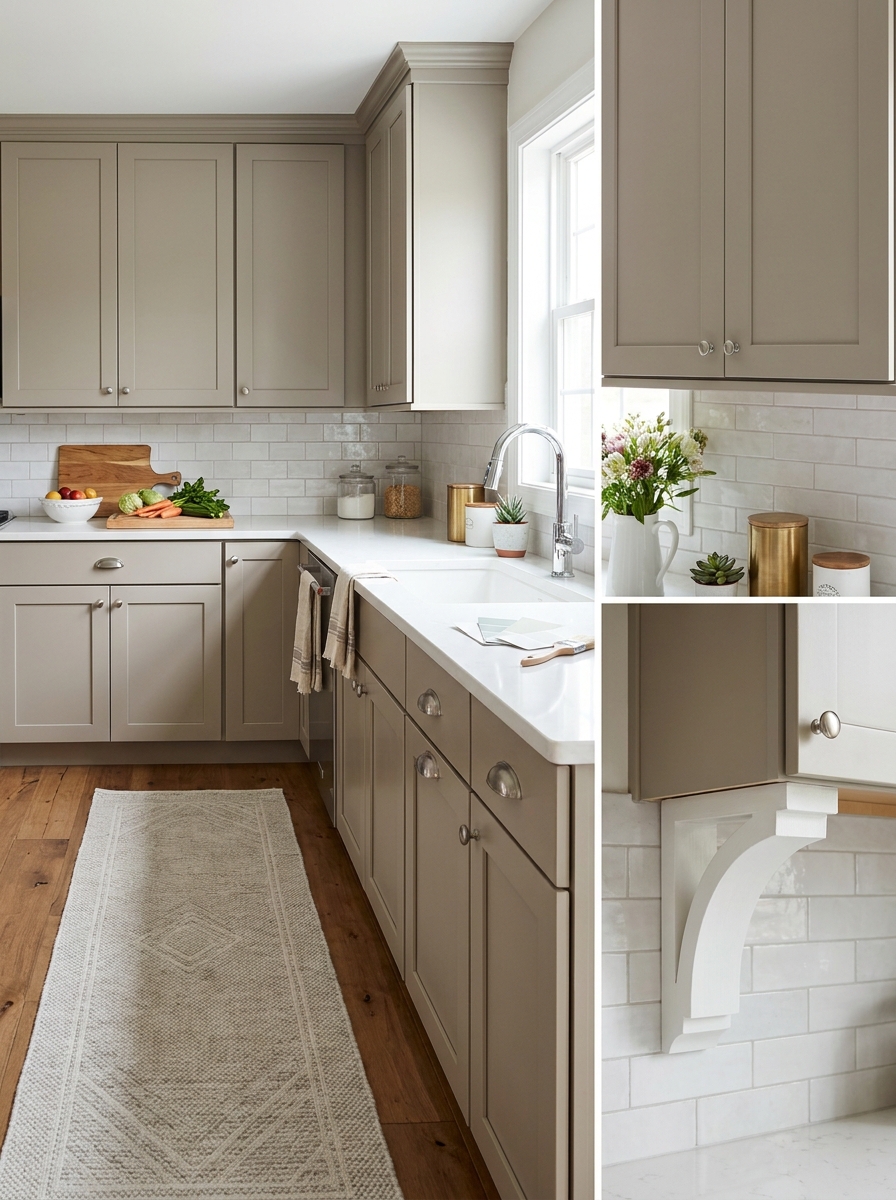
Adding decorative corbels or brackets under your upper cabinets or open shelving is like giving your kitchen architectural jewelry. These little supports add visual weight and character, especially if your cabinets feel too plain or builder-grade. They make everything look custom and considered. You can find corbels in every style imaginable, from simple modern angles to ornate Victorian scrollwork. Install them under the front corners of your upper cabinets where they meet the wall, or use them to support open shelving you’ve added. Paint them to match your cabinets or make them a statement in a contrasting finish. This is one of those details that makes people stop and say “wait, did you get new cabinets?” Nope, just added twenty-dollar brackets. The transformation is especially dramatic if you’ve got plain slab-door cabinets that need some personality. Suddenly your boring boxes have dimension and charm, like they’ve always been there.
Pro Tip: Install corbels slightly inset from the cabinet edge rather than flush with the front. It looks more intentional and architectural, plus it’s way more forgiving if your walls aren’t perfectly straight.
Cabinet Door Swap: Same Boxes, Completely New Look

Here’s a secret the pros don’t always tell you: you can replace just the cabinet doors and drawer fronts while keeping your existing boxes. It’s like getting new cabinets for a fraction of the cost. I did this in my last kitchen and people thought we’d done a full renovation. We went from flat-panel oak doors to shaker-style painted ones, and the transformation was absolutely stunning. The boxes were perfectly fine — why replace them? You can order custom doors online or from big box stores, and they’ll cut them to your exact measurements. Choose a different style, a different color, even a different material. Suddenly your builder-grade kitchen looks like a custom design. The installation is straightforward if you’re handy with a drill. Most doors come pre-drilled for hinges, and you’re basically just swapping old for new. It’s a weekend project that delivers renovation-level results without the renovation-level price tag or mess.
Pro Tip: Measure your existing doors three times before ordering — width, height, and the distance between hinge holes. Take photos of your current hinge setup so you can match the style or know what adapter plates you might need.
Wallpaper the Cabinet Backs: Unexpected Pop of Pattern

Want to know my favorite sneaky design move? Wallpaper the back panel of your open shelving or glass-front cabinets. It’s like giving your dishes a gorgeous backdrop they didn’t know they needed. I used a soft blue and white chinoiserie pattern behind my white dishes, and now that cabinet is the star of my kitchen. Every time someone walks in, their eyes go straight there. It’s unexpected, it’s personal, and it costs maybe thirty dollars. Peel-and-stick wallpaper makes this incredibly easy. Measure your cabinet back, cut your paper, smooth it on. If you hate it in six months? Peel it off. No commitment, no damage, just pure fun. This works beautifully in glass-front cabinets too. Suddenly your everyday dishes look like they’re in a boutique display. I’ve seen people use geometric patterns, vintage florals, even bold stripes. The pattern adds depth and interest without overwhelming your whole kitchen.
Pro Tip: Choose a pattern that complements your dish colors but doesn’t compete with them. If you have colorful dishes, go with a subtle pattern. Plain white dishes? That’s your chance to go bold with color and pattern.
Furniture Legs on Islands: Elevate Builder-Grade to Custom

This one little trick makes people think you had custom cabinetry built: add decorative furniture legs to your kitchen island. It instantly transforms that boxy builder-grade look into something that feels designed and intentional. I added turned wooden legs to my plain island, painted them the same navy as my lower cabinets, and suddenly it looked like a piece of furniture instead of just… cabinets. The legs gave it presence, personality, and honestly a bit of elegance. You can find legs at home improvement stores or online in dozens of styles — chunky farmhouse, sleek tapered, ornate traditional. They attach right to the base of your island, and you can usually do it yourself with some wood glue and screws. The magic is in how this changes the whole visual weight of your island. Instead of a heavy box sitting on the floor, you now have something that looks lighter, more furniture-like, more expensive. It’s the kind of detail that makes people think you spent way more than you did.
Pro Tip: Make sure your island has enough clearance underneath before buying legs — you need at least 3-4 inches of recessed toe-kick space. Measure twice, because returning heavy wooden legs is no fun at all.
Your Kitchen, Refreshed and Ready
Here’s what I love about cabinet updates: they prove you don’t need a massive budget or a construction crew to completely transform how your kitchen feels. You just need to know which changes create the biggest impact. Maybe you start with hardware because it’s quick and confidence-building. Or maybe you’re ready to dive into paint and completely change your kitchen’s personality. Either way, you’re working with what you have instead of ripping everything out and starting over. These aren’t band-aid fixes. They’re intentional updates that make your kitchen feel custom and collected instead of builder-basic. And the best part? You can do most of them in a weekend without hiring anyone or living in renovation chaos for months. So grab your paint samples or start browsing hardware. Your kitchen is about to get the refresh it deserves, and you’re about to prove that smart updates beat full renovations every single time.
Frequently Asked Questions
Can I paint kitchen cabinets without sanding them first?
Technically yes, but you’ll get way better results with at least a light sanding. You don’t need to strip them down to bare wood — just rough up the surface with 220-grit sandpaper so the primer has something to grip. Use a deglosser if you really hate sanding, but don’t skip prep entirely or your paint will chip off in a month.
What’s the most durable paint for kitchen cabinets?
Cabinet-specific paints like Benjamin Moore Advance or Sherwin-Williams Emerald Urethane are your best bet. They’re formulated to cure hard and resist chips better than regular wall paint. If you’re on a budget, a high-quality primer plus a satin finish paint will work, but expect to be gentler with your cabinets and maybe touch up occasionally.
How do I choose between knobs and pulls for cabinet hardware?
Use knobs on cabinet doors and pulls on drawers — it’s the most functional and looks custom. Pulls give you better grip for heavier drawers, while knobs work perfectly for doors. You can mix metals too if you keep the finish consistent, like all brushed or all polished, just in different metal tones.
Will removing cabinet doors for open shelving make my kitchen look messy?
Only if you don’t style them intentionally. Stick to a tight color palette for what you display, use matching or coordinating dishes, and leave some breathing room between items. Remove doors from just one or two cabinets rather than everything, and keep everyday messy stuff behind closed doors elsewhere.
How long does it take to paint kitchen cabinets yourself?
Plan for 3-4 days minimum if you’re doing it right. Day one is removing doors and hardware, cleaning, and sanding. Day two is priming. Days three and four are two coats of paint with drying time between. You can speed it up slightly, but rushing means drips, brushstrokes, and a finish you’ll regret. Take your time and do it once instead of twice.