
You know that feeling when you walk into your kitchen and just… sigh? Maybe the cabinets feel too dark. The counters are screaming 1987. Or everything’s just a little too builder-grade basic for the cozy farmhouse vibe you’re craving. I’ve been there. And here’s the thing about farmhouse kitchen remodels — they’re not about ripping everything out and starting from scratch with a massive budget. The best transformations happen when you blend old and new, mix a little DIY grit with some smart splurges, and let that warm, lived-in charm shine through. This isn’t about creating a magazine spread that nobody actually cooks in. It’s about making your kitchen feel like the heart of your home — where the coffee’s always on, the bread’s rising on the counter, and everything just feels right. I’m sharing 14 real-deal farmhouse kitchen remodel ideas that’ll show you exactly what’s possible. Some are big moves, some are weekend projects. All of them work. Let’s get into it.
White Shiplap Wall Transformation

Nothing says farmhouse kitchen quite like crisp white shiplap walls. And the before-and-after impact? Absolutely stunning. I’ve seen so many kitchens go from dated wallpaper or plain drywall to that gorgeous horizontal-lined texture that instantly makes everything feel more intentional. The beauty of shiplap is how it adds architectural interest without overwhelming the space. It catches light differently throughout the day, creating subtle shadows that give your walls actual personality. You can shiplap one accent wall behind open shelving or go full-room for maximum impact. The prep work matters here — you’ll want to remove any existing wallpaper and repair major wall damage first. But once it’s up? Pure magic. It’s that perfect backdrop for hanging vintage finds, displaying your favorite dishes, or just letting your morning coffee moment feel a little more special. The texture works beautifully with both modern farmhouse and true rustic vibes, depending on how you style around it. And honestly, even if your walls are currently that builder-beige nightmare, shiplap can cover a multitude of sins while adding that cozy cottage character you’re after.
Pro Tip: Install shiplap horizontally with a nickel gap (using actual nickels as spacers) for authentic farmhouse texture — it’s way more forgiving than trying to get perfectly flush boards.
Open Shelving Instead of Upper Cabinets

Ripping out those bulky upper cabinets and replacing them with open shelving is one of those remodels that photographs like a dream — and actually makes your kitchen feel twice as big. The before is usually dark, closed-off, and a little cave-like. The after? Light, airy, and suddenly you’ve got room to breathe. Open shelving forces you to be intentional about what you display, which honestly makes you a better curator of your own stuff. You’ll find yourself reaching for the pretty bowls, the vintage crocks, the dishes that actually make you happy. Installation is surprisingly straightforward if you’re even moderately handy. Heavy-duty brackets, solid wood shelves (go for at least 1.5 inches thick so they don’t sag), and you’re golden. The key is styling them so they look collected, not cluttered. Group items by color or height, leave some breathing room, and don’t be afraid of a little asymmetry. I love mixing everyday dishes with a few decorative pieces — maybe a small cutting board, a vintage scale, or a ceramic pitcher with fresh herbs. It’s that perfect balance of functional and beautiful. And yes, you’ll dust more often, but the trade-off in visual space is absolutely worth it.
Pro Tip: Style your open shelves in groups of three or five items per shelf, alternating heights and leaving at least 25% of each shelf empty so it looks curated instead of crowded.
Butcher Block Countertop Upgrade
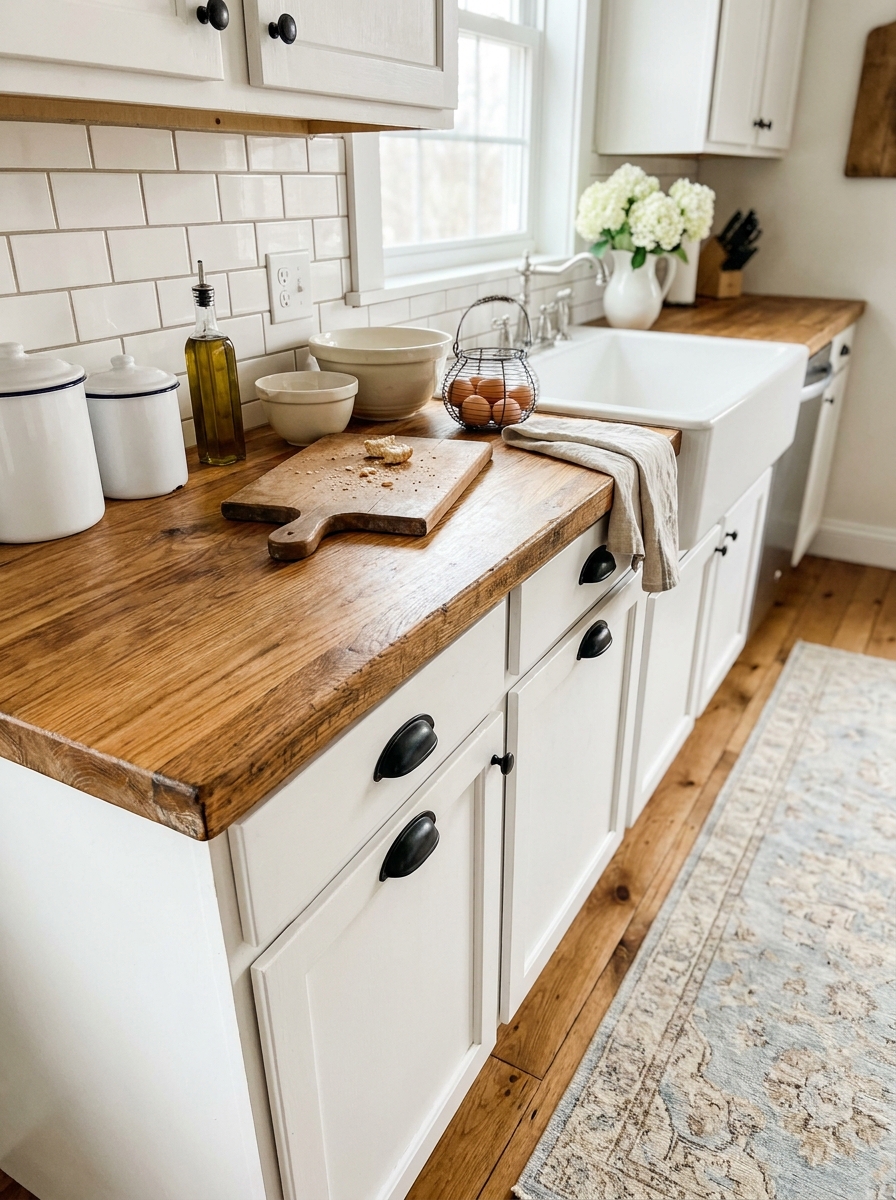
Swapping out tired laminate or dated tile countertops for warm butcher block is one of those remodels that completely changes the energy of your kitchen. The before feels cold and generic. The after? Instant soul. Butcher block brings in that natural wood warmth that farmhouse kitchens absolutely crave. It’s softer underfoot when you’re leaning against the counter (which, let’s be honest, you do constantly). It ages beautifully — every knife mark and water ring tells a story. And compared to granite or quartz, it’s surprisingly budget-friendly, especially if you’re willing to do some of the finishing work yourself. You’ll want to seal it properly with food-safe mineral oil or a polyurethane finish depending on how you plan to use it. I’m partial to oiled finishes because they’re easy to maintain and you can sand out any damage over the years. The color options range from light maple to rich walnut, but for true farmhouse vibes, that honey oak or natural maple tone is perfection. It plays beautifully with white cabinets, complements open shelving, and gives you a workspace that actually makes you want to roll out pie dough at six in the morning.
Pro Tip: Oil your butcher block countertops monthly for the first year with food-grade mineral oil to build up protection — after that, every few months is plenty to keep them gorgeous.
Farmhouse Sink Installation
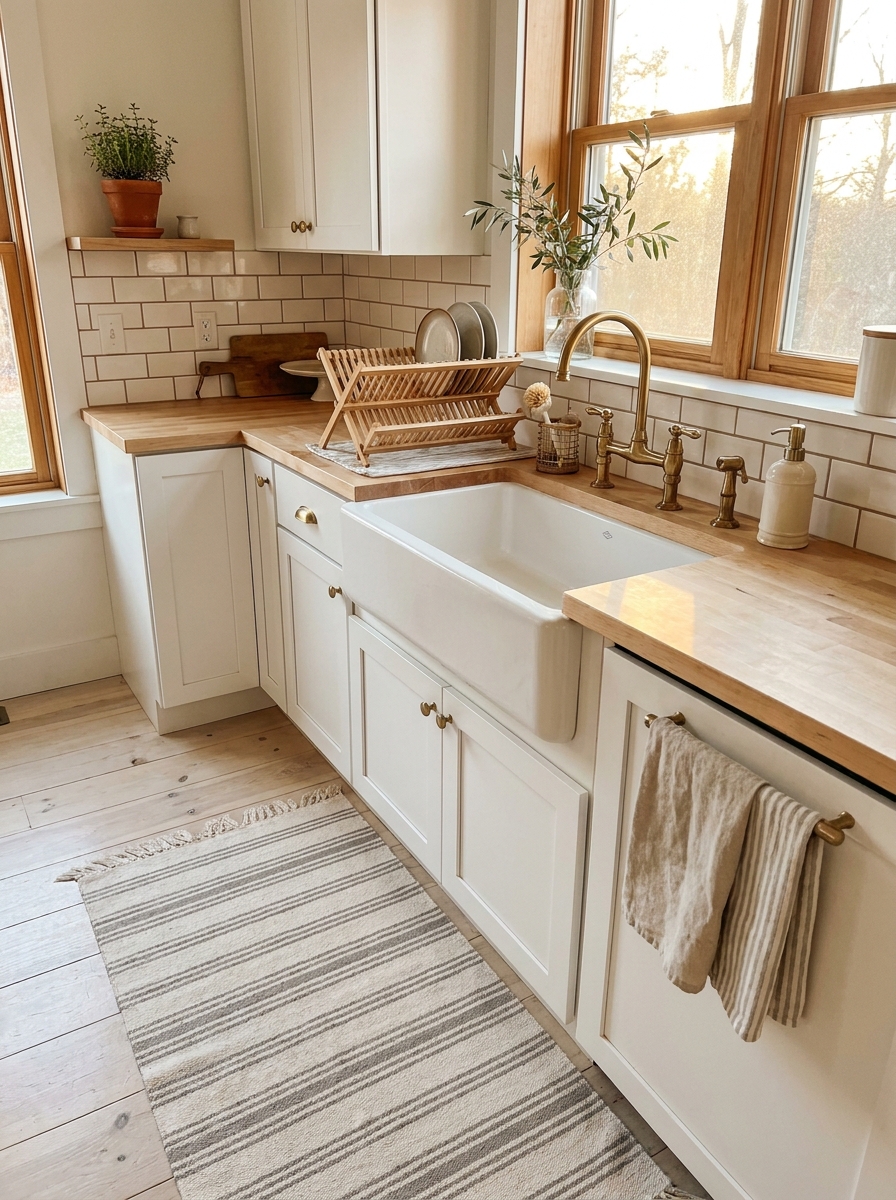
Installing a deep farmhouse apron-front sink is one of those remodel moves that makes you wonder why you waited so long. The difference between a standard drop-in sink and a generous farmhouse basin is night and day. Before, you’re doing dishes in a shallow sink that barely fits your largest pot. After? You’ve got this beautiful, deep, functional centerpiece that actually makes kitchen cleanup less miserable. The exposed front apron becomes a design feature all on its own — whether you choose classic white fireclay, warm copper, or even matte black for a modern farmhouse twist. Installation does require some cabinet modification since the sink sits partially in front of the cabinet face, so this isn’t exactly a DIY Saturday project unless you’re very handy. But the impact is worth every bit of effort and expense. I love how a white farmhouse sink catches light throughout the day, how it anchors the whole kitchen design, and how much easier it is to fill big stock pots or wash oversized baking sheets. Pair it with a vintage-style bridge faucet or a simple gooseneck in oil-rubbed bronze, and you’ve got yourself a before-and-after moment that’ll make your whole kitchen feel like it belongs in the countryside.
Pro Tip: Measure your sink base cabinet carefully before ordering — most farmhouse sinks need at least a 33-inch base cabinet, and you’ll want to confirm the apron height works with your countertop thickness.
Cabinet Painting Project From Dark to Bright

Oh my goodness, painting dark oak cabinets white was the single biggest wow moment in our farmhouse kitchen makeover. The before photos look like a totally different house — heavy, dated, and honestly a little depressing. The after? It’s like the whole room took a deep breath and opened up. I’m not gonna lie, this project took patience. We stripped, sanded, primed, and painted every single door. My husband thought I was crazy at first, but when we hung those crisp white cabinets back up, he literally stood there speechless. The kitchen felt twice as big, the natural light bounced everywhere, and suddenly our vintage finds actually popped against the clean backdrop. The transformation cost us about $300 in supplies versus $15,000 for new cabinets. We kept the original solid wood boxes and just refreshed everything. New brushed brass hardware was the cherry on top — it added that perfect farmhouse elegance without going too rustic.
Pro Tip: Use a high-quality bonding primer like Benjamin Moore Advance or Sherwin-Williams ProClassic — it’s the secret to cabinets that actually stay painted without chipping every time you close a door.
Vintage Lighting Fixtures That Changed Everything

Swapping out our builder-grade flush mount lights for vintage-inspired pendants was like flipping a switch on the whole vibe. The before lighting was so bland and forgettable — you know, those boob lights that came with every house in 2005. The after makes me smile every single time I walk into the kitchen. We hung three black metal schoolhouse pendants over our island, and suddenly the space had personality and warmth. The Edison bulbs cast this gorgeous amber glow in the evenings that makes everything feel cozy and inviting. I also added a vintage-style chandelier over our breakfast nook — found it at a flea market for $60 and had it rewired. Lighting is honestly one of those things people overlook, but it’s such a game changer. It’s not just about seeing better, it’s about creating mood and highlighting all those beautiful farmhouse details you worked so hard on. The right fixtures pull the whole look together.
Pro Tip: Mix your lighting temperatures strategically — use warm white bulbs (2700K) in pendants and ambient fixtures to create that cozy farmhouse glow, and save the brighter daylight bulbs for under-cabinet task lighting where you actually need to see what you’re chopping.
Subway Tile Backsplash Installation
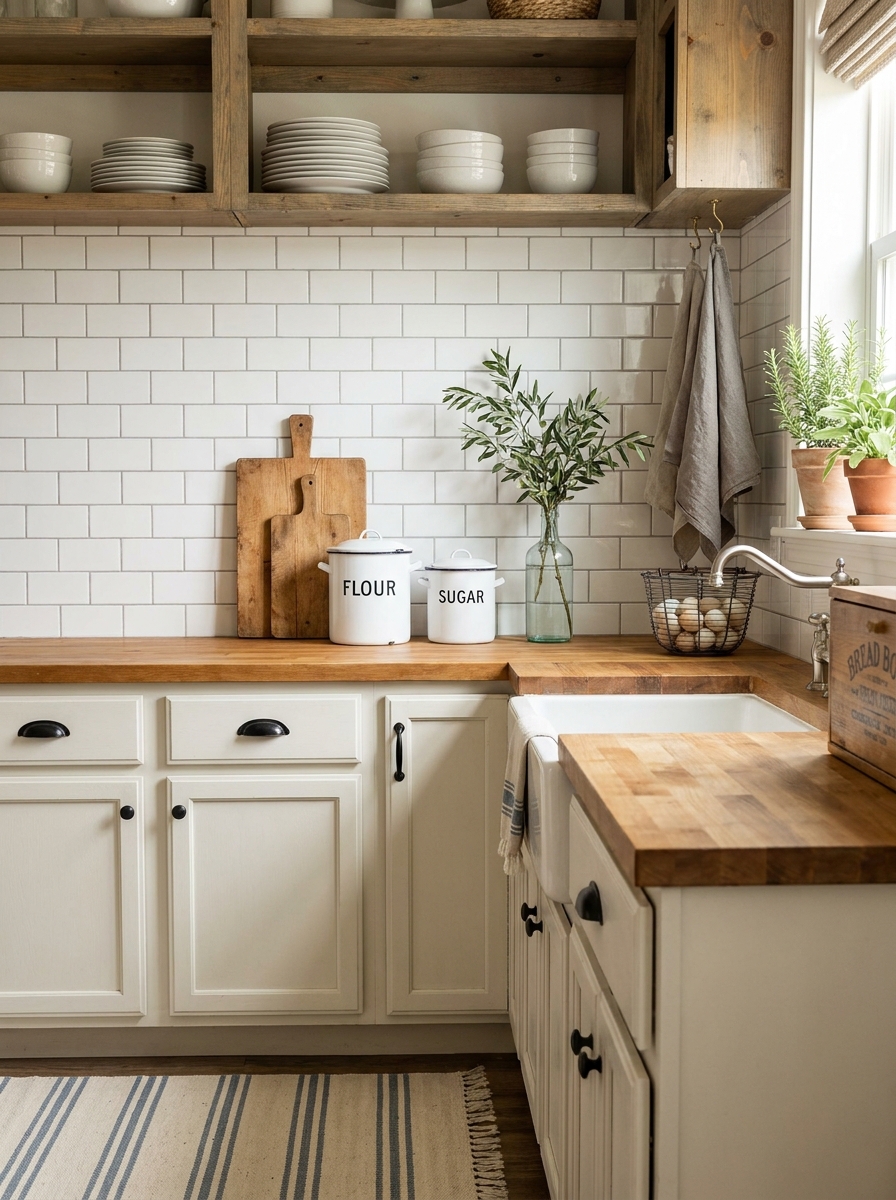
Installing a classic white subway tile backsplash was hands-down the most satisfying DIY project in our whole remodel. The before was this sad beige laminate backsplash that came up about four inches — basically useless and ugly. The after is clean, timeless, and so farmhouse perfect. We tiled all the way up to the bottom of our open shelves, which made the walls feel taller and way more polished. I went with a traditional 3×6 subway tile in a brick pattern with light gray grout because I wanted something that felt authentic, not trendy. The whole project cost about $400 in materials and took us one long weekend. What I love most is how the white tile reflects light and makes the whole kitchen feel brighter. It’s also incredibly practical — I can wipe down spaghetti sauce splatters without worrying about staining. The simple, clean lines let our vintage accessories and wood tones really shine without competing for attention.
Pro Tip: Spend the extra money on a good wet tile saw rental and premium tile spacers — trust me, perfectly straight lines and consistent grout spacing make the difference between a DIY project that looks homemade versus professionally installed.
Kitchen Island Addition From Scratch
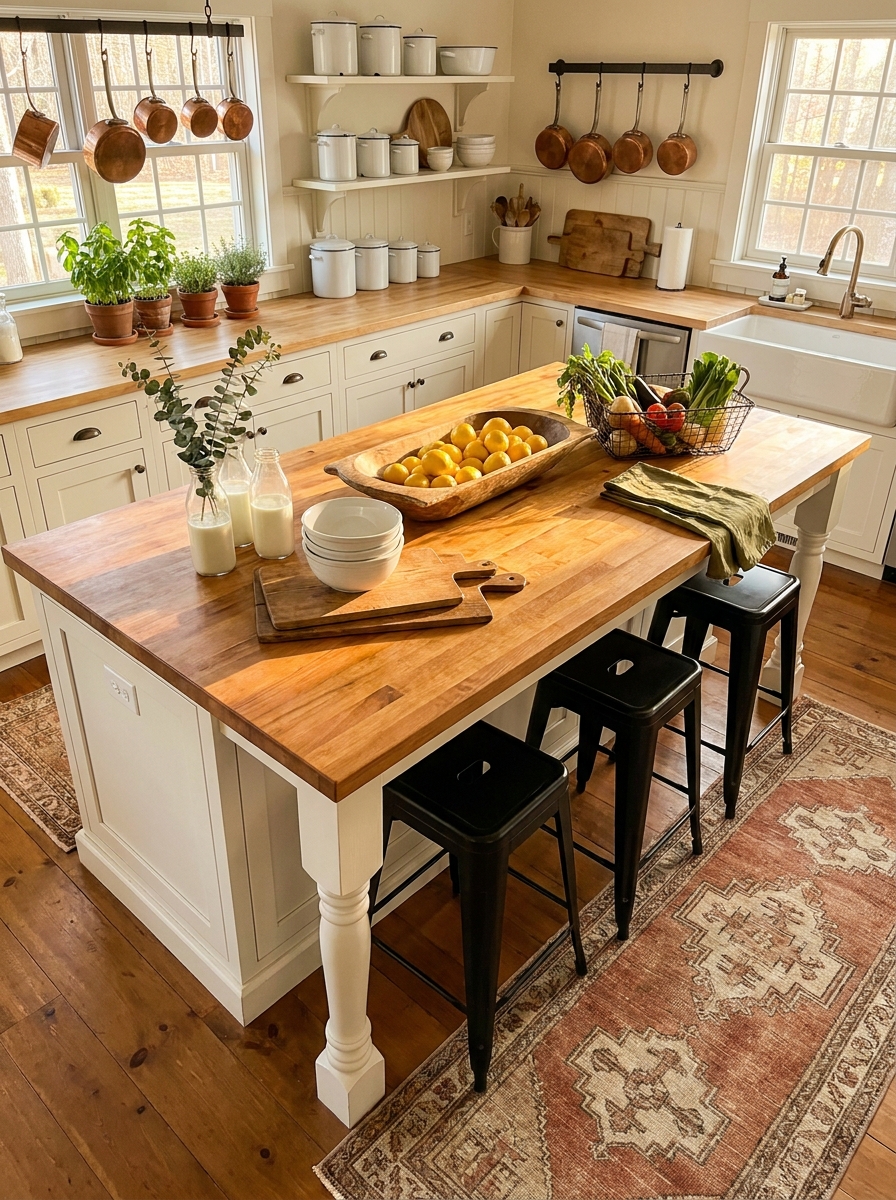
Adding a custom farmhouse island to our previously island-less kitchen was the transformation that made me actually tear up. The before was just empty floor space that we awkwardly tried to fill with a too-small cart. The after gave us a true heart-of-the-home gathering spot that changed how we live in this kitchen. We built the island ourselves using stock cabinets from a home improvement store, added furniture-style legs, and topped it with thick butcher block. It’s big enough for three stools, has tons of storage underneath, and creates the perfect work triangle with our sink and stove. The best part? It only cost about $800 total, and it looks like a $3,000 custom piece. Now this island is where my kids do homework while I cook, where we roll out pie dough at Thanksgiving, and where friends gather with wine glasses during dinner parties. It’s not just functional storage — it’s the soul of our farmhouse kitchen.
Pro Tip: Make sure your island is at least 36 inches away from your cabinets and appliances on all sides — this gives you enough room to open drawers and doors comfortably while someone’s sitting at the island, which is crucial for a kitchen that actually functions well.
Reclaimed Wood Ceiling Beams That Added Character

My kitchen felt flat and boring until I looked up. Literally. Adding reclaimed wood beams to the ceiling was the transformation I didn’t know I needed. I found weathered barn wood from a local salvage yard. The wood had this gorgeous patina you can’t fake. We installed three massive beams running the length of the kitchen. The difference was instant. The room felt grounded, cozy, and so much more interesting. Before, my white ceiling just disappeared. After, those dark wood beams created contrast and drew your eye upward. They made my 8-foot ceilings feel taller somehow. The rustic texture against the smooth white shiplap walls? Chef’s kiss. The best part is how they tie everything together. My butcher block island, my open shelving, my vintage finds — they all make sense now. The beams gave my kitchen a backbone. They added that authentic farmhouse feel I was chasing. Every time I walk in, I look up and smile.
Pro Tip: Don’t stress about perfectly matching wood tones. Mismatched beams with different weathering actually look more authentic and collected over time.
Hardwood Flooring Replacement Over Old Linoleum

Can we talk about how much ugly flooring can drag down an entire kitchen? I lived with peeling beige linoleum for two years before I finally ripped it out. Best decision ever. Underneath that awful linoleum was a concrete slab. Not ideal, but we made it work. I chose wide-plank oak flooring in a honey tone. Nothing too precious or perfect. I wanted floors that could handle real life — spills, dropped pans, muddy boots. The installation took three days. Watching that gross linoleum come up was so satisfying. When the new floors went down, my whole kitchen transformed. Suddenly my white cabinets looked brighter. My island looked more intentional. Everything felt cohesive. The wood added warmth my kitchen desperately needed. Before, the space felt cold and temporary. After, it felt like a real farmhouse kitchen. The grain, the texture, the way light hits the planks — it’s those details that make you fall in love with your kitchen all over again.
Pro Tip: Choose flooring slightly darker than your island or butcher block counters. The contrast defines spaces and hides dirt better than matching tones.
Window Trim and Molding Upgrade for Period Detail

My builder-grade windows with their skinny little trim always bothered me. They looked cheap and unfinished. Adding thick farmhouse-style trim was easier than I expected and totally changed the character of my kitchen. I went with chunky 5-inch trim painted in the same warm white as my cabinets. We added rosette blocks in the corners for that authentic period look. The windows suddenly looked like they belonged in an old farmhouse instead of a 1990s subdivision. The before and after is subtle but powerful. Before, the windows just sat there doing nothing. After, they became architectural features. They frame the view. They add weight and presence. Combined with simple linen cafe curtains, they give my kitchen that collected-over-time vibe. This upgrade cost maybe $200 in materials and a weekend of work. But it’s one of those changes that elevates everything else. Your eye reads quality. The room feels more intentional, more finished, more like the farmhouse kitchen you’ve been pinning for years.
Pro Tip: Paint your window trim the same color as your cabinets instead of stark white. It creates a cohesive look that feels custom and intentional.
Pantry Door Replacement with Vintage Barn Door Hardware
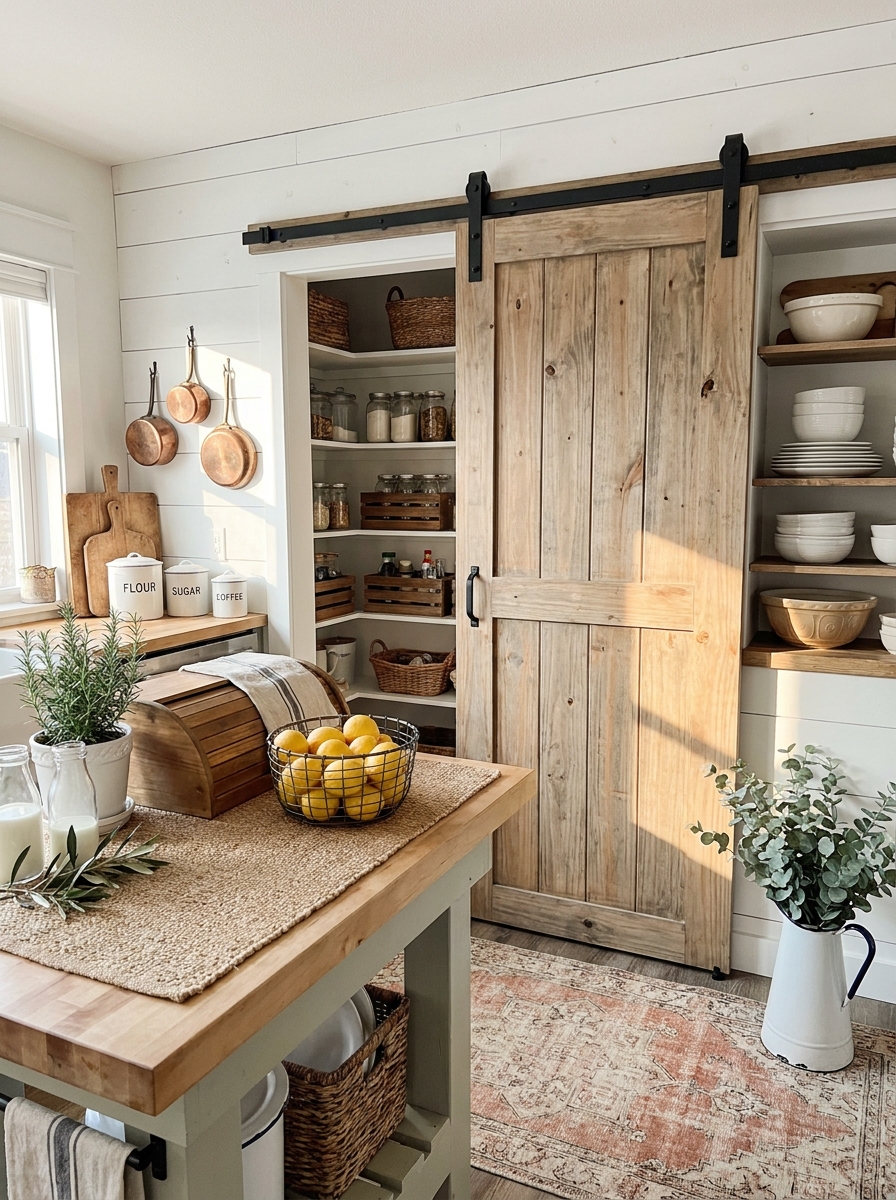
My old pantry door was a hollow-core disaster that stuck every time you opened it. Swapping it for a sliding barn door was the statement piece my kitchen needed. I found a solid wood five-panel door at an architectural salvage shop. We stripped the old paint, sanded it down, and left the wood natural with just a clear seal. The black metal track hardware was surprisingly affordable online. Installation took one afternoon. Before, that corner of my kitchen was forgettable. After, the barn door became a focal point. It adds texture, movement, and that rustic farmhouse vibe without trying too hard. When it’s open, it slides along the wall and disappears. When it’s closed, it’s a beautiful architectural element. The best surprise? How much easier it is to access the pantry. No more fighting a swinging door when your arms are full of groceries. The barn door glides smoothly and stays put. Function and beauty in one weekend project.
Pro Tip: Mount your barn door track an inch higher than you think you need. Doors settle over time, and you want clearance so it glides smoothly.
Corner Cabinet Pull-Out Organizer That Ended Kitchen Chaos

You know that dark corner cabinet where measuring cups go to die? I tackled mine during our remodel and honestly wish I’d done it years earlier. Before, I’d lose half my Tupperware lids in that black hole. After installing a pull-out corner organizer system, everything changed. The transformation wasn’t just about storage — it changed how I actually use my kitchen. I went from avoiding that cabinet entirely to reaching for my stand mixer without doing yoga poses. The installer cut the existing shelves and fitted a two-tier lazy Susan system with pull-out trays. Game changer. What shocked me most? How much more cabinet space I suddenly had everywhere else. When corner cabinets actually work, you stop shoving things randomly into other spots. My baking supplies have a home now. My pots nest properly. I can see what I own, which means I stopped buying duplicate whisks. The before photo shows a cluttered mess of stacked bowls. The after shows organized bliss with labels and everything visible.
Pro Tip: Measure your corner cabinet opening before buying organizers — standard sizes don’t fit older farmhouse kitchens, and custom solutions save you from returns and frustration.
Range Hood Cover Built From Salvaged Wood Planks

My builder-grade metal range hood was functional but soul-crushing. It screamed 1990s apartment, not farmhouse kitchen. I couldn’t afford a fancy custom hood, so I built a wood cover myself using reclaimed pine planks from an old barn. The before was shiny stainless steel that clashed with everything. The after? A stunning wood-wrapped hood that looks like it cost thousands. I kept the existing vent mechanism inside and built a frame around it using simple 1×6 boards. Two coats of weathered gray stain later, and suddenly my range became the kitchen’s focal point. This project took one weekend and maybe $150 in materials. I added corbels underneath for that authentic farmhouse look and installed a small shelf on top for vintage crocks. Friends ask if it came with the house. Nope — just some wood, determination, and YouTube tutorials. The transformation photographs beautifully. What was once the ugliest thing in my kitchen now gets more compliments than anything else.
Pro Tip: Leave a two-inch gap between your wood cover and the actual vent hood for airflow — pretty doesn’t matter if you set your kitchen on fire during Thanksgiving.
Your Farmhouse Kitchen is Waiting
Here’s what I love most about farmhouse kitchen remodels — they’re not about perfection. They’re about warmth, character, and creating a space that actually feels like home. You don’t need to gut everything and start from scratch. Sometimes it’s just painting those cabinets white, adding open shelving, and bringing in a butcher block island. Sometimes it’s the farmhouse sink you’ve been dreaming about for three years. And sometimes it’s all of it, one project at a time, as your budget and energy allow. The before-and-after photos I see from real people (not magazine spreads) are always my favorites because you can feel the love that went into them. The carefully chosen hardware. The vintage finds mixed with new pieces. The imperfect, lived-in details that make a kitchen actually yours. So grab your inspiration photos, make your plan, and start somewhere. Paint a wall. Switch out the lighting. Install those open shelves you’ve been pinning for months. Your cozy farmhouse kitchen is closer than you think, and trust me — that first morning when you walk in and everything just feels right? Totally worth it.
Frequently Asked Questions
How much does a farmhouse kitchen remodel cost on average?
A farmhouse kitchen remodel typically costs between $15,000–$40,000 for a full renovation, but you can achieve a beautiful transformation for much less with strategic updates. Painting cabinets, adding open shelving, and updating hardware can run $2,000–$5,000. Focus on high-impact changes like a farmhouse sink ($800–$2,500 installed) or butcher block counters ($1,500–$4,000) if you’re working with a tighter budget.
Can I do a farmhouse kitchen remodel on a small budget?
Absolutely! Start with paint — white or cream cabinets instantly create farmhouse vibes for $300–$800 in materials if you DIY. Add vintage-style hardware ($3–$8 per pull), install a DIY shiplap accent wall ($200–$500), and swap your light fixtures for farmhouse-style pendants ($100–$300). These changes create dramatic before-and-after results without breaking the bank.
What are the best colors for a farmhouse kitchen remodel?
Classic farmhouse kitchens shine with warm white or cream cabinets paired with natural wood tones in countertops or flooring. Add soft accent colors like sage green, dusty blue, or warm gray through decor and textiles. The key is keeping your base neutral and warm, then layering in subtle color through dishes, rugs, and vintage finds for that collected-over-time farmhouse charm.
Should I remove upper cabinets for open shelving in my farmhouse kitchen?
Open shelving creates that airy, authentic farmhouse look and makes small kitchens feel larger — but it’s not for everyone. Consider removing uppers on one wall while keeping closed storage elsewhere for a balanced approach. You’ll need to style shelves thoughtfully and dust more often, but the visual impact and opportunity to display beautiful dishes makes it worthwhile for many homeowners. Make sure you have adequate storage elsewhere before committing.
What’s the most impactful farmhouse kitchen remodel project to start with?
Painting your cabinets white or cream delivers the biggest visual transformation for the lowest cost — it’s the ultimate farmhouse kitchen before-and-after move. If your cabinets are already light, install a farmhouse apron-front sink as your anchor piece, then build your remodel around it. Both projects dramatically shift your kitchen’s aesthetic and set the foundation for all your other farmhouse updates.