
You know that moment when you step into your bathroom, look around, and think, why does this room still feel so builder-basic when the rest of my home is finally getting cute? Been there. Bathrooms are sneaky like that. They’re small, so every boring detail shows up loud and clear: the flat mirror, the sad lighting, the faucet that somehow looks tired even when it’s clean. The good news is you do not need a full gut job or a giant budget to make a bathroom feel polished, layered, and honestly kind of expensive. A few smart swaps can change the whole mood. Think better hardware, richer paint, prettier lighting, and those little styling details that make a space feel more boutique hotel than rushed weekday routine. In this guide, I’m walking through 21 ideas that give major visual payoff without the scary renovation bill. Some are weekend projects. Some are just clever upgrades. All of them are realistic for real homes and real budgets. Here’s what actually works.
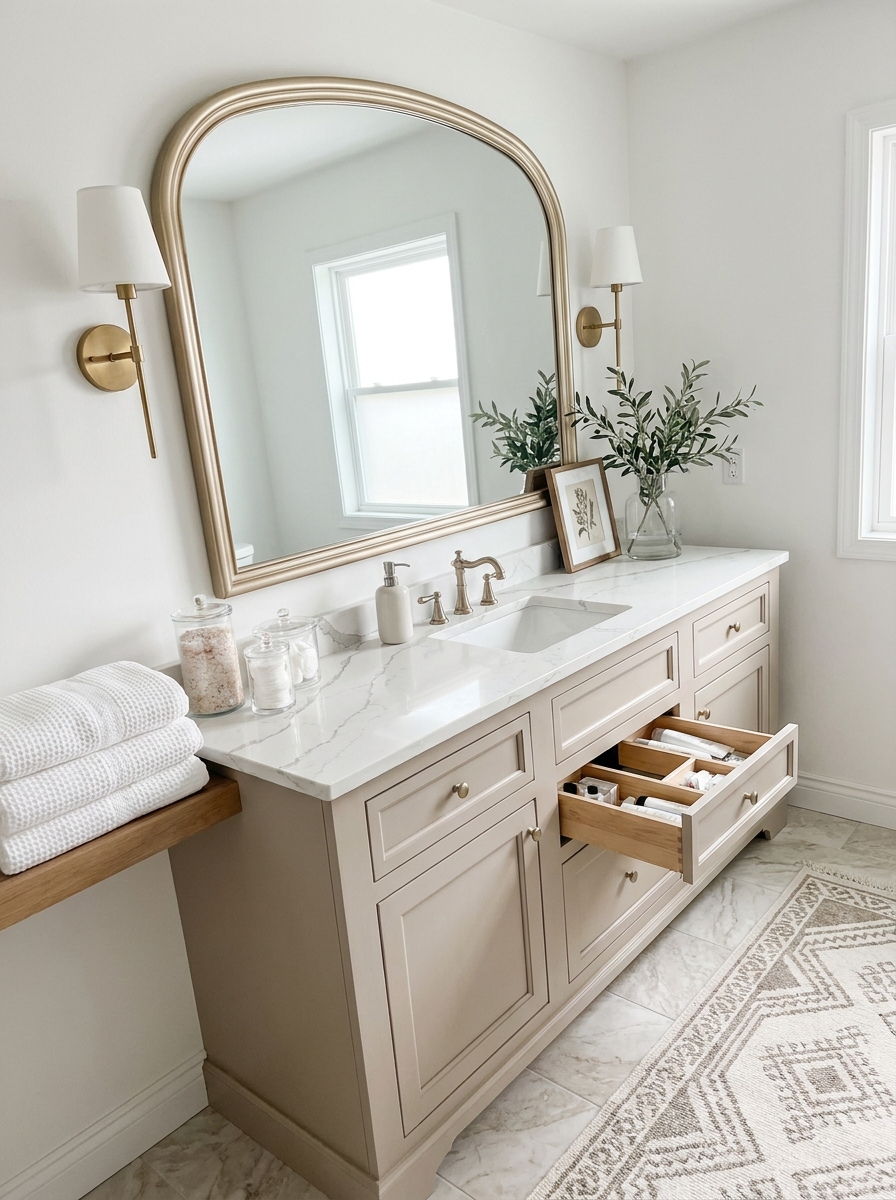
Paint the Vanity a Rich, Custom-Looking Color

If your vanity is one of those standard builder-grade pieces in tired oak or plain white, paint can completely change the story. And I mean completely. A deep mushroom, soft charcoal, dusty blue-gray, or muted sage instantly makes the room feel designed instead of installed. It’s one of the cheapest upgrades in the whole bathroom, but visually, it works overtime. The trick is choosing a color with a little depth. Skip anything too bright or flat. Expensive bathrooms usually lean into colors that feel calm, grounded, and slightly moody. Pair that painted vanity with fresh hardware and suddenly the whole sink wall starts giving boutique-hotel energy. Even if the cabinet itself is basic, color adds shape and presence. Prep matters here, unfortunately. I wish I could tell you to just slap on a coat and call it a day, but a good clean, sanding, and bonding primer make the finish look smoother and more professional. Use a satin or semi-gloss cabinet paint so it can handle steam and splashes. It’s not glamorous work, but this is one of those before-and-after changes that makes you stop in the doorway and smile.
Pro Tip: Test paint swatches directly on the vanity doors and check them morning, afternoon, and evening before committing.
Swap the Flat Mirror for a Framed Statement Piece
Nothing says rental-energy quite like that plain sheet mirror glued to the wall with zero personality. Replacing it with a framed mirror is one of my favorite cheap tricks because it adds instant architecture. Suddenly the vanity area feels intentional. More finished. More expensive. And yes, more Pinterest-worthy. You don’t need an ornate antique or some wildly pricey custom piece either. A simple arched mirror, a slim black frame, or a warm brass edge can do the job beautifully. The key is scale. Go larger than you think, especially if your bathroom is small. A bigger mirror reflects more light and makes the whole room feel more open, which is always a win. If removing the old builder mirror feels dramatic, you can also frame it with trim kits or DIY molding. That’s the budget-friendlier route, and honestly, it can still look really good when painted to match the room. Add sconces or better bulbs nearby and the whole vanity wall starts feeling layered instead of flat. It’s one of those upgrades guests notice right away, even if they can’t quite explain why the room suddenly looks so polished.
Pro Tip: Hang the new mirror so the center sits around eye level and leave just enough space above the faucet for balance.
Trade Basic Hardware for Jewelry-Like Pulls and Knobs

Tiny detail, huge payoff. That’s hardware in a bathroom. Those little knobs and pulls might seem too small to matter, but when you swap cheap builder-grade pieces for something with weight and shape, the vanity instantly looks more custom. It’s like changing plastic earrings for gold hoops. Same person, very different vibe. I love unlacquered-look brass, matte black, or even polished nickel if the rest of the bathroom leans classic. Just keep the finish consistent with your faucet or your light fixture so everything feels connected. Mixed metals can work, but in a small bathroom, matching usually looks cleaner and more expensive. This is also a great fix if you can’t afford a new vanity. Add hardware with a slightly longer profile, a subtle curve, or a tailored backplate and the cabinet feels upgraded without much effort. And please, don’t underestimate the feel of quality here. A solid pull has a nice little heft to it, and that tactile detail actually matters in a room you use every single day. It’s practical, yes, but it also gives the whole space that finished, no-shortcuts feeling that expensive bathrooms always seem to have.
Pro Tip: Before buying new pulls, measure the existing drill hole spacing so you don’t create an accidental patching project.
Upgrade the Faucet for an Instant High-End Signal

A dated faucet can drag down the entire bathroom. Even if your tile is decent and your vanity is fine, an old shiny chrome faucet with awkward curves can make everything feel older than it is. Swap it out, though, and the room starts looking sharper in about twenty minutes. It’s kind of ridiculous how much difference one fixture can make. Look for a faucet with a clean silhouette and a finish that feels current but classic. Brushed brass is warm and pretty. Matte black is bold and graphic. Polished nickel has that expensive hotel look if you love something timeless. You do not need the fanciest brand on the market. You just need good lines. What makes this upgrade so satisfying is that it changes both the look and the daily experience. Turning on a sleek new faucet somehow makes even a rushed Tuesday morning feel more put together. Pair it with a matching drain, fresh caulk around the sink, and a simple tray on the counter, and the whole vanity starts reading as intentional design. It’s one of the smartest places to spend a little money because your eye goes there constantly, and so does everyone else’s.
Pro Tip: Choose a faucet finish that matches your cabinet hardware first, then add lighting in the same metal for a cohesive look.
Add Wall Sconces to Fake a Custom Designer Layout
If you want your bathroom to stop looking like an afterthought, lighting is where the magic happens. Specifically, sconces. A pair of pretty wall lights flanking the mirror instantly gives that custom-built look we all pin and save and then stare at for weeks. It feels architectural, even if the room started out painfully basic. The nice thing is you have options. Hardwired sconces look the most seamless, but plug-in and battery-powered styles have gotten so much better. If rewiring sounds like a hard no, there are still ways to get the look without opening walls. That’s good news for renters and anyone trying to keep the remodel budget from spiraling. Choose shades that fit your style. Milk glass feels classic, linen shades feel softer, and metal shades add a little edge. Just avoid anything too tiny. Bathroom lighting should feel substantial enough to balance the mirror. And once those sconces are up, even a modest vanity starts looking more expensive because the whole wall has rhythm and symmetry. It’s one of those details people associate with higher-end homes, which is exactly why it works so well in a budget makeover.
Pro Tip: Mount sconces at about eye level and keep them evenly spaced from the mirror edges so the setup feels intentional, not cramped.
Use Peel-and-Stick Floor Tile That Mimics Stone

Bathroom floors take up more visual space than we realize. When they’re dated, the whole room feels dated. That’s why peel-and-stick tile can be such a game changer on a budget, especially if your existing floor is screaming early-2000s rental in the least charming way possible. The trick is choosing a pattern that looks quiet and expensive. Think soft stone looks, subtle checkerboard, or marble-inspired designs with gentle movement. Skip anything overly busy or fake-looking. The goal is to fool the eye a little, not announce that you found a bargain at 11:30 p.m. while stress-scrolling home projects. And yes, prep matters here too. Clean, level floors make a huge difference in how these tiles wear and how believable they look once installed. Add a pretty runner on top and suddenly the floor has depth, softness, and style. It’s especially good in powder rooms and guest baths where you want maximum impact without major labor. For a budget-friendly swap, this one really pulls its weight. It anchors the room, makes everything else look fresher, and gives that expensive layered look you usually get from much pricier materials.
Pro Tip: Order one extra box of peel-and-stick tile now so you’ll have matching pieces later for repairs or tricky cuts.
Hang a Linen Shower Curtain High and Wide

This one is such a sneaky little designer move. Hanging the shower curtain rod higher and a bit wider than the tub makes the whole bathroom feel taller, softer, and way more expensive. It changes the proportions of the room in the best way. And if you swap a stiff plastic-looking curtain for linen or a linen-blend panel, the difference is immediate. Cheap shower curtains tend to cling, wrinkle oddly, and flatten the whole space. A fuller fabric curtain has weight and drape, which reads upscale right away. I love soft white, warm ivory, or even a subtle stripe if the rest of the room is simple. It’s not flashy. It just looks better. If your budget is tight, this is one of the first upgrades I’d do in a bathroom with a tub-shower combo. It covers a huge amount of visual area, so changing it changes everything around it. Add a curved rod if you want even more room and a nicer silhouette. Suddenly the bathroom feels less like a standard setup and more like a calm, thoughtful space where every detail got a little extra attention. Honestly, it’s a curtain. But it really does a lot.
Pro Tip: Mount the rod four to six inches above the window or shower surround line to make the ceiling feel taller.
Bonus Quick Guide: Where to Save vs. Where to Splurge

When you’re trying to make a bathroom look expensive on a budget, not every item deserves the same energy or money. Some things can absolutely be faked. Some really shouldn’t be. And once you know the difference, planning gets so much easier. Save on the vanity if the structure is solid. Paint and hardware can transform it. Save on flooring with good peel-and-stick or budget porcelain that mimics stone. Save on decor too. Pretty trays, framed printables, and fluffy white towels can look high-end without the markup. Splurge a little on the faucet, mirror, and lighting if you can. Those are the pieces your eye notices first, and cheap-looking versions tend to give themselves away fast. If there’s room for one more upgrade, spend it on a better shower curtain and liner. It sounds boring, but a curtain that hangs beautifully changes the whole room. The sweet spot is mixing practical budget choices with a few statement details that feel substantial. That’s the formula. Not everything has to be expensive. A few things just need to look like they are.
Pro Tip: Pick two visual splurges max, then keep everything else simple so those upgrades stand out even more.
Style the Counter Like a Boutique Hotel, Not a Drugstore
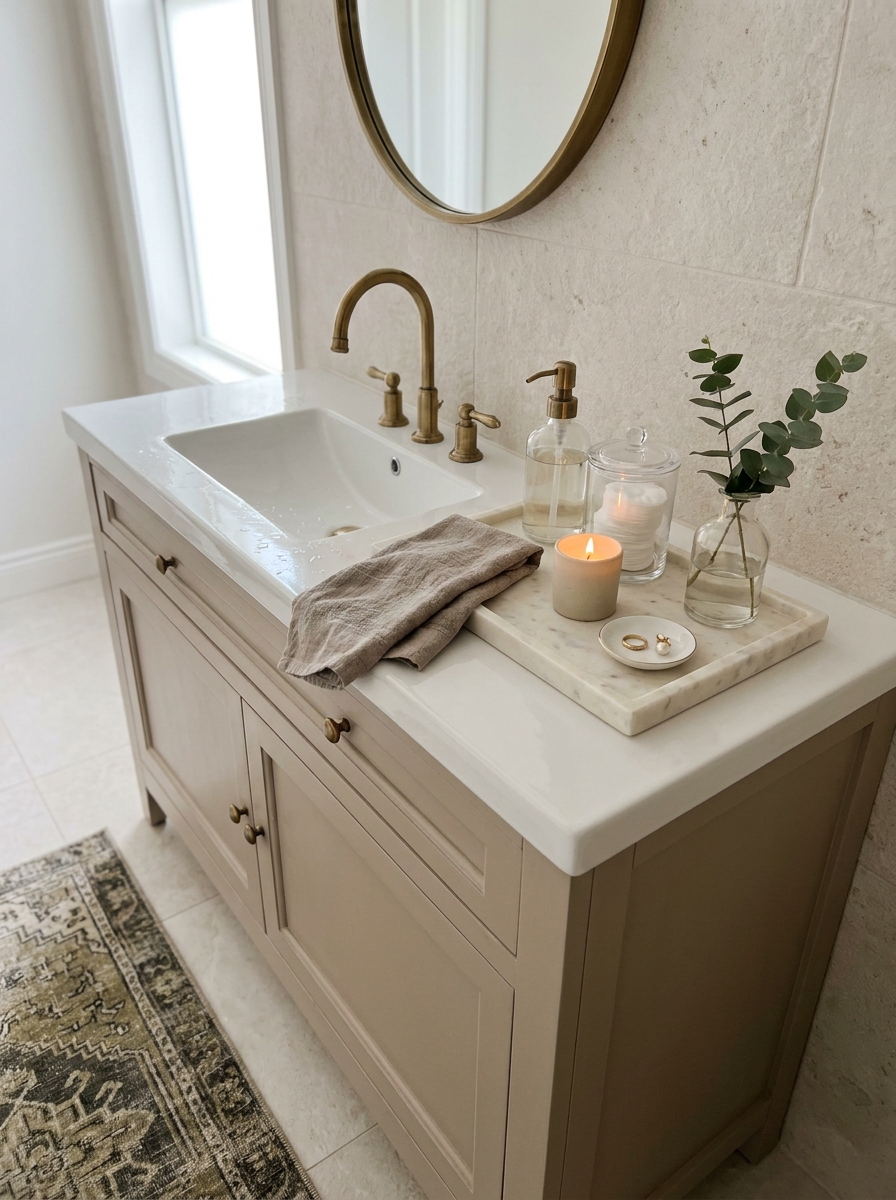
A bathroom can have great bones and still look messy if the counter styling is off. This is where a lot of expensive-looking bathrooms quietly win. They don’t have a dozen products shouting at you from every corner. They’re edited. Calm. Pretty, but useful. Start with a tray. It corrals the daily stuff and makes even ordinary items look intentional. A soap dispenser, a candle, a small bud vase, maybe one jar for cotton rounds. That’s enough. If your skincare lineup is extensive, tuck most of it into drawers or baskets and keep only the nicest-looking essentials out. The goal isn’t to make your bathroom look unused. Nobody wants that weird showroom vibe. You want it to feel lived in, just in a polished way. A folded hand towel, a tiny dish for earrings, a stem of eucalyptus, maybe a perfume bottle you actually love. Those little details make the room feel cared for. And because the bathroom is usually small, the counter becomes a visual focal point fast. Keep it edited and elevated, and the whole space feels more luxurious. It’s a simple styling shift, but wow, it changes the mood in about five seconds.
Pro Tip: Use one tray no wider than half the vanity so the counter still feels open and easy to clean.
Replace Tired Caulk and Grout for a Cleaner, Pricier Finish

This is not the glamorous tip. I know. But if you want your bathroom to look expensive, fresh caulk and clean grout matter more than almost anything decorative. You can have the prettiest mirror and the fluffiest towels in the world, but yellowed caulk around the tub will ruin the illusion in one glance. The good news is this fix is cheap. Very cheap. It just takes a little patience and maybe a podcast. Scrape out the old cracked stuff, clean the area well, and apply a crisp new bead. Same with grout refresh products if your tile lines are dingy or uneven. It’s one of those details that makes the whole room feel newer because it signals care. And honestly, expensive bathrooms aren’t always about fancy materials. They’re often just very clean, very crisp, and very well maintained. Fresh white caulk around a sink or tub edge sharpens every line in the room. Clean grout makes tile look intentional again. It’s a small maintenance move, but visually, it creates that polished finish we all want. Sometimes the room doesn’t need more stuff. It just needs the old ugly bits to quietly disappear.
Pro Tip: Use painter’s tape along both sides of the caulk line before applying for a cleaner edge and less cleanup.
Wrap the Walls in Trim for a Quiet Luxury Moment

If a bathroom feels plain, it usually needs architecture. That sounds expensive, but this is one of my favorite little tricks. Add simple picture-frame molding or box trim to the walls, then paint everything the same color. Suddenly the room feels thoughtful. Finished. Like it came with the house instead of being stuck there by a builder in a rush. What makes this work is the tone-on-tone look. You are not trying to make the trim shout. You want it to whisper. Soft greige, warm white, pale stone, even a moody blue-gray can look gorgeous when the trim and wall color match. It adds depth without clutter, which is exactly why it reads expensive. In a tiny powder room, this can totally change the mood. In a guest bath, it gives that polished hotel feeling people notice right away. And the best part? The materials are usually pretty affordable. A few trim boards, a nail gun rental, caulk, and paint can go a long way. It is one of those upgrades that looks custom because most people skip it. Which is exactly why you should not.
Pro Tip: Keep the lower trim boxes evenly spaced and start them a few inches above the baseboard so the layout looks intentional, not cramped.
Install a Tile Backsplash That Climbs Higher Than Expected

A short little backsplash behind the sink is fine. But if you want that expensive look, take the tile higher. Way higher. Running a simple, budget-friendly tile up to the mirror or even the ceiling makes the bathroom feel more layered and custom. It gives the eye something to land on, and it instantly makes the vanity wall feel designed instead of basic. This works especially well with affordable subway tile, zellige-look ceramic, or even marble-look porcelain. The trick is not picking the priciest material. It is using a humble material in a more dramatic way. A taller backsplash makes the vanity area feel important, almost like a feature wall. In a builder-grade bathroom, that one move can shift the whole room from forgettable to boutique. I also love how practical it is. Bathrooms get splashed. A lot. So this upgrade is not just pretty, it is useful. Choose grout that blends with the tile for a smoother, more upscale look. It keeps the whole thing feeling calm and expensive, instead of busy and choppy. Honestly, it is one of those changes that does a lot of heavy lifting.
Pro Tip: Use larger tile samples and tape them vertically on the wall first so you can test how high the backsplash should go before committing.
Bring in One Warm Wood Accent to Soften All the Hard Surfaces

Bathrooms can get cold fast. Tile, mirrors, porcelain, chrome. It is a lot. One of the easiest ways to make the room feel richer is to add a warm wood element. Think a small stool, an open shelf, a bath caddy, or even a simple oak cabinet door swap if you are feeling ambitious. That little bit of natural texture makes everything around it look more expensive. This is such a good move if your bathroom feels sterile. Wood adds balance. It keeps the room from looking too shiny or flat, and it creates that layered designer look people love right now. I especially like this in bathrooms with black or brass accents, because the warmth of the wood makes the metal feel even more intentional. You do not need a giant rustic piece either. In fact, smaller is usually better. One clean-lined wood accent can do more than a bunch of accessories. It grounds the space and gives your eye a place to rest. When a bathroom has that mix of polished finishes and one natural note, it feels collected. And collected always looks more expensive than perfectly matched.
Pro Tip: Choose a sealed or water-resistant wood tone close to natural oak so it feels fresh and elevated, not orange or heavy.
Hide the Visual Clutter With Matching Storage Pieces
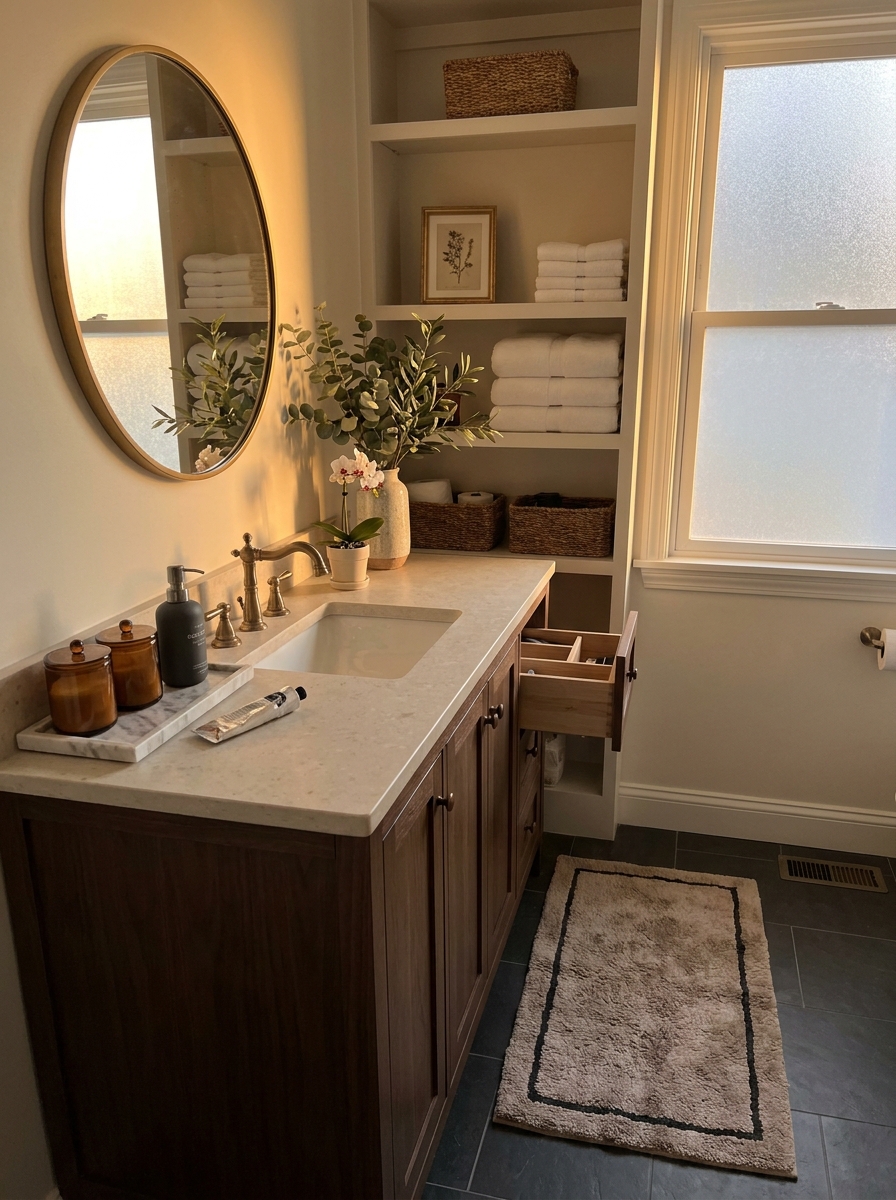
Nothing makes a bathroom look cheaper faster than random packaging everywhere. Bright labels, plastic bottles, half-used boxes, hair tools in a pile. Even if the finishes are pretty, clutter can cancel all of it out. So one of the smartest budget upgrades is not really a renovation at all. It is getting your storage under control with matching containers, baskets, and drawer organizers. This is where the magic happens. Decant everyday items into simple dispensers. Corral backup products in lidded bins. Use one finish throughout so the room feels consistent. Woven baskets, acrylic organizers, smoked glass jars, little trays inside drawers. It all adds up to a bathroom that feels calmer and more expensive because nothing is fighting for attention. I always say luxury is often just editing. You do not need less stuff. You just need less visible stuff. When everything has a home, the room instantly feels bigger, cleaner, and more intentional. And in a small bathroom, that matters so much. It gives you that polished, magazine-ish feeling without replacing a single fixture. Honestly, it is one of the best before-and-after moves on the cheapest budget.
Pro Tip: Remove product labels or buy refillable bottles in one finish so the countertop and shower niche look instantly more cohesive.
Replace the Toilet Seat and Small Fixtures Nobody Thinks About

This one is not glamorous, but wow does it matter. An old toilet seat, yellowed vent cover, builder-basic toilet paper holder, or dinged-up flush lever can quietly drag down the whole room. You may not notice these pieces at first, but your brain absolutely registers them. When they look worn, the bathroom feels tired. When they look fresh, everything suddenly feels upgraded. I love this kind of remodel idea because it is sneaky. A new soft-close toilet seat feels cleaner and more current right away. Swapping the toilet paper holder and towel ring to match your faucet finish creates a nice thread through the room. Even replacing an old air vent cover with a crisp new one makes the space feel cared for. These are tiny details, but expensive-looking rooms are built on tiny details. Think of it like getting dressed. The big pieces matter, sure, but the shoes and jewelry pull it all together. Bathrooms are exactly the same. When every little fixture looks intentional and in good shape, the room stops feeling patched together. It feels complete. And complete is what reads high-end, even if you spent less than you would on dinner out.
Pro Tip: Measure the bolt spread and shape of your existing toilet before buying a new seat so it fits cleanly and does not shift over time.
Create a Shower Niche Look Without a Full Gut Renovation

Built-in shower niches are one of those details that always feel custom. But if tearing open tile is not in the budget, you can still fake the same polished vibe. A recessed-look shower caddy, a slim ledge shelf, or a neatly mounted stone-look corner shelf can give you that clean, edited feel without a huge project. The goal is simple: get the bottles off the floor and make storage look integrated. What makes a bathroom feel expensive is not just what is there. It is what is missing. No rusty wire rack hanging from the showerhead. No avalanche of shampoo bottles. When shower storage is streamlined, the whole room feels calmer and more intentional. I love using matching bottles here too, especially in a guest bath. It feels so spa-like. If your shower is visible from the vanity, this matters even more. That sightline can either help the room or hurt it. A tidy, elevated shower setup makes the entire bathroom look more finished. And because these shelves or caddies are usually affordable, the return is huge. It is one of those practical upgrades that quietly makes everything else around it look more expensive too.
Pro Tip: Mount the shelf at chest height and keep only daily essentials there so it looks styled, not overloaded.
Use Oversized Art to Make the Room Feel Designed, Not Leftover
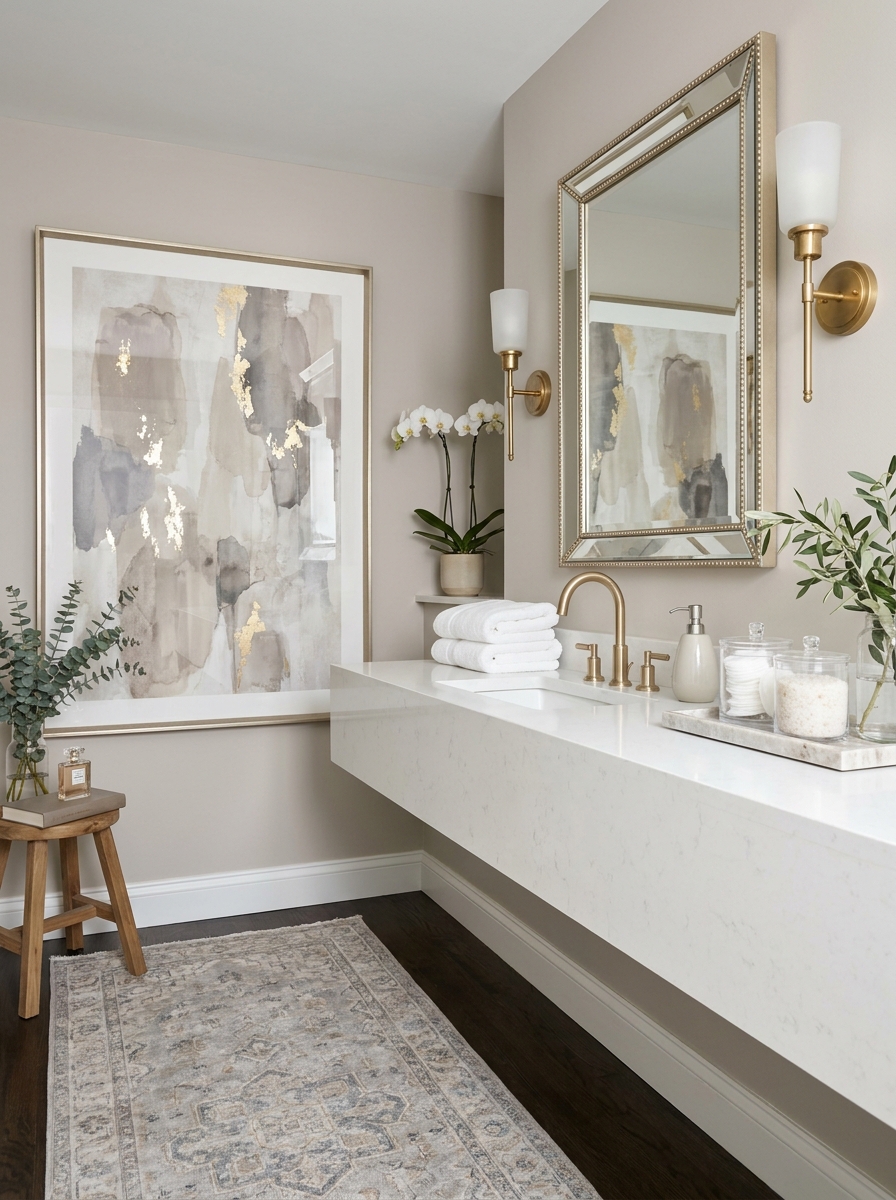
Bathrooms are notorious for getting the saddest little art. One tiny print floating on a huge wall. A generic quote in a flimsy frame. You know the look. If you want the room to feel expensive, go bigger. Oversized art adds confidence. It makes the space feel decorated on purpose, like someone really thought about it. This is especially great in powder rooms and guest baths where you can have a little fun. A large abstract, a moody landscape, or a vintage-style sketch in a substantial frame can totally transform the mood. It draws attention away from plain finishes and gives the room personality. Suddenly the bathroom feels layered and collected instead of purely functional. The trick is making it feel scaled to the wall. Bigger art often looks more expensive because it fills the space properly. And you do not have to spend a fortune. Printable art, thrifted frames, and even framed fabric can work beautifully. Once it is up, the room feels less like a utility zone and more like part of the home. That shift is huge. Luxury spaces always feel considered, and art is one of the fastest ways to get there.
Pro Tip: Use a frame with a wide mat or thicker profile so inexpensive art looks more substantial and gallery-like.
Upgrade to Plush White Towels and Fold Them Like a Boutique Hotel
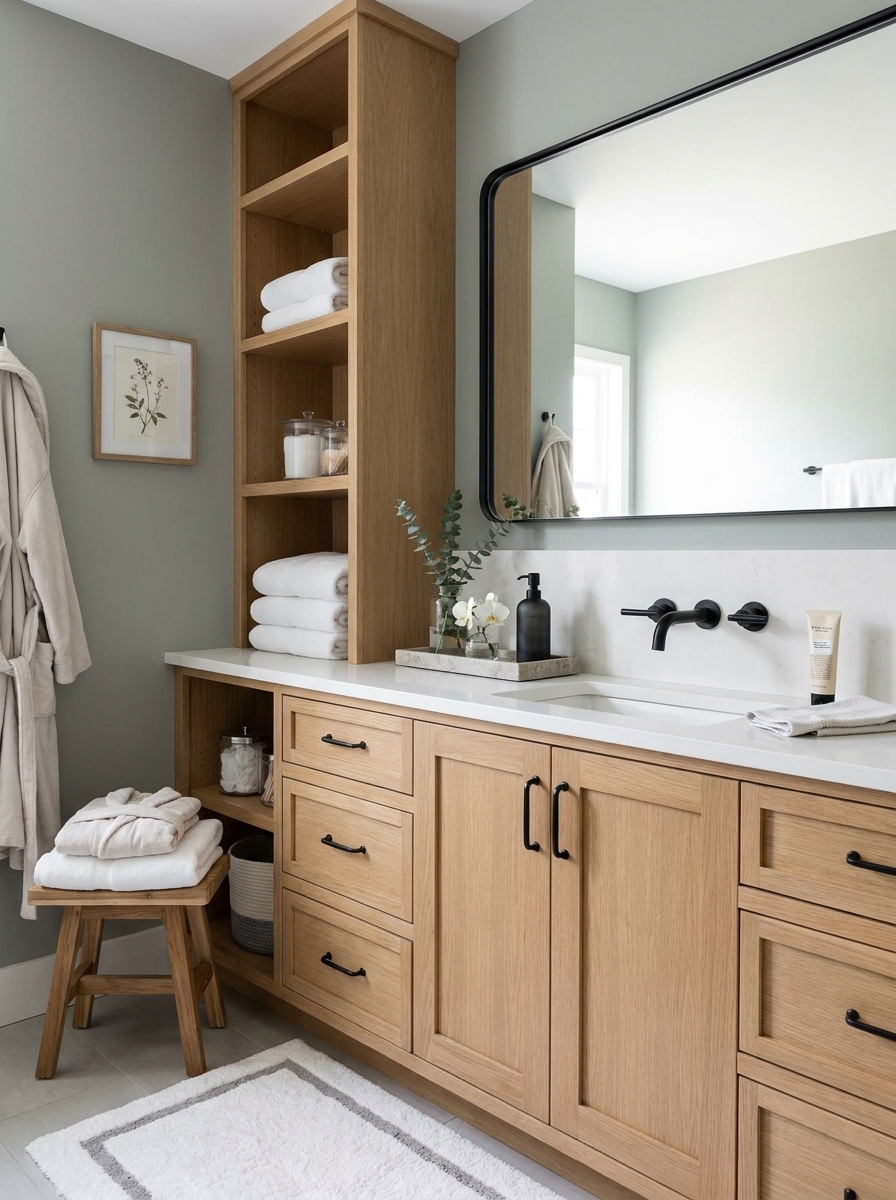
Sometimes the cheapest way to make a bathroom feel expensive is with textiles. Good towels change everything. Thin, mismatched, faded towels make even a pretty room feel a little sad. But thick white or soft neutral towels? Instant hotel energy. They make the whole bathroom feel cleaner, brighter, and more elevated without touching a single permanent finish. I love sticking to one towel color because it creates visual calm. White is classic for a reason, but warm ivory or pale taupe can be gorgeous too. The point is consistency. Then fold them neatly, stack them with a little intention, or roll hand towels in a basket. It sounds small, but it has a huge impact. It gives the room that ready-for-guests feeling, which always reads luxe. This is also one of those upgrades that feels good every single day. Not just for looks. Better towels make your morning routine feel nicer. And that is what a high-end bathroom really is, right? A space that looks beautiful and feels lovely to use. If your budget is tight, skip random decor and buy the nicest towels you can afford. You will notice them immediately.
Pro Tip: Wash new towels once with a little white vinegar and no fabric softener to help them stay fluffy and absorbent.
Lean Into One Metal Finish and Repeat It Everywhere You Can

Mixed metals can be beautiful, but in a budget bathroom they can also look accidental fast. One shiny chrome faucet, a black light fixture, brass hardware, silver frame. It starts to feel messy. If you want a more expensive result, choose one main metal finish and repeat it throughout the room. That consistency makes everything feel calmer and more custom. This does not mean you need to replace every single thing at once. Start with the most visible pieces. Faucet, towel bar, toilet paper holder, frame, light fixture, maybe even a soap pump. When those elements speak the same language, the room suddenly feels pulled together. It is such a simple design trick, but it works every time. I usually tell people to pick the finish that flatters the room best and then commit. Brushed brass feels warm, polished nickel feels classic, matte black feels crisp and graphic. There is no wrong answer. The expensive part is the repetition. Designers do this all the time because it creates rhythm. And rhythm makes a room feel intentional. Even if the materials are affordable, that visual consistency gives the whole bathroom a much more elevated look.
Pro Tip: Take one hardware sample with you when shopping so you can compare undertones and avoid mismatched brass or nickel finishes.
Refresh the Door and Trim So the Whole Room Feels Finished

We spend so much time looking at vanities and tile that we forget the door, casing, and baseboards are part of the room too. If they are chipped, yellowed, or scuffed, the bathroom will never feel fully polished. A fresh coat of paint on the door and trim can make the entire space feel cleaner and more expensive almost overnight. I love this because it is not flashy, but it ties everything together. Crisp trim sharpens the room. A freshly painted door in satin or semi-gloss catches the light in such a pretty way. If you want to be a little bolder, painting the door a soft contrasting color can look really custom, especially in a powder room. It gives the space character without needing much square footage. And please do not forget the door hardware. A new knob or lever can make an old door feel brand new. That little click of a solid, updated handle is weirdly satisfying. It is one of those details that makes the room feel complete from the moment you walk in. Expensive spaces feel finished at every angle. This is how you get that feeling without a giant renovation bill.
Pro Tip: Fill dents and sand trim before painting so the new finish looks smooth and crisp instead of highlighting old damage.
Change the Light Bulbs and Color Temperature for a Softer, Pricier Glow

This one sounds tiny. I know. But wow, it changes everything. A bathroom with harsh, blue-white bulbs can make even pretty finishes look cheap and flat. Switch to a softer, flattering bulb and suddenly the room feels calmer, warmer, and way more expensive. It is the kind of upgrade people notice without knowing why. Your mirror looks better. Your wall color looks richer. Even basic tile gets that smooth, glowy look. I always say lighting is the mood-maker nobody budgets for. You do not need a full rewiring project to get the effect. Just be intentional. Pick bulbs that feel clean but not icy, bright but not blinding. In most bathrooms, that sweet spot is warm enough to soften the space while still letting you put on makeup or shave without guessing. It feels more like a chic hotel and less like a storage closet with plumbing. And if your bulbs are mismatched right now, fix that first. One warm bulb and one cool bulb in the same bathroom is chaos. Matching bulbs instantly make the room feel more polished, more custom, and honestly more grown-up.
Pro Tip: Use LED bulbs in the 2700K to 3000K range and make sure every visible fixture in the bathroom uses the exact same color temperature.
Quick Guide
Quick Guide: Save on paint, peel-and-stick or budget porcelain tile, decor, trays, printables, and towels. Splurge on faucet, mirror, and sconces because those read as quality first. If you have a little extra, upgrade the shower curtain and liner too. Best budget formula: one paint project, one hardware swap, one lighting or mirror upgrade, and one styling pass. That combo gives the room the biggest expensive-looking shift without turning into a full renovation.
Your Bathroom Can Feel Fancy Without the Fancy Price
The best part about a budget bathroom remodel is that it doesn’t have to be dramatic to feel transformative. A prettier mirror, a richer vanity color, better lighting, cleaner lines, softer textiles. Those little shifts add up fast. And suddenly the room you used to rush through starts feeling calm, polished, and honestly kind of special. That’s what I love most about these 21 ideas. They’re not showroom tricks meant for giant homes and unlimited budgets. They’re real-life upgrades that work in guest baths, powder rooms, and those builder-grade spaces that just need a little imagination. You can do one this weekend and another next month. It still counts. It still changes the room. So if your bathroom has been sitting on the maybe someday list, let this be your nudge. Start with the detail that annoys you most, or the one that excites you most. Either works. And if you want, save your favorite ideas, make a tiny plan, and begin there. A beautiful bathroom is closer than it looks.
Frequently Asked Questions
What are the cheapest budget bathroom remodel ideas that still look expensive?
Painting the vanity, changing hardware, replacing the mirror, upgrading the faucet, and styling the counter are some of the cheapest high-impact moves. Fresh caulk and grout also make a bathroom look dramatically cleaner and more polished for very little money.
How can I make a builder-grade bathroom look luxurious on a budget?
Focus on the vanity wall first because that’s where the eye goes. Add a framed mirror, better lighting, updated hardware, and a richer paint color, then finish with crisp white towels and a simple tray for that boutique-hotel feel.
Is peel-and-stick tile worth it for a budget bathroom makeover?
It can be, especially in powder rooms and low-traffic bathrooms where you want a fast visual upgrade. The key is choosing a realistic pattern and prepping the floor properly so the finished look feels smooth and believable.
What colors make a small bathroom look more expensive?
Soft greige, warm white, mushroom, dusty blue-gray, sage, and charcoal all work beautifully. These shades feel calm and elevated, and they pair well with brass, black, or polished nickel for a more custom look.