
Your teacher desk is where you spend half your day — grading papers, sipping lukewarm coffee, and trying to remember where you put that permission slip. But let’s be honest, it probably looks a little… tired. Maybe it’s covered in sticky notes and mystery stains, or maybe it’s just begging for some personality. The good news? You don’t need a big budget to give it a total refresh. With just $30 or less, you can turn that bland workspace into something that actually makes you smile when you sit down. We’re talking paint, thrift store finds, and clever DIY tricks that look way more expensive than they are. No fancy tools required, and definitely no need to spend your whole paycheck at the home store. From contact paper magic to dollar store organizing hacks, these 13 ideas will show you exactly how to makeover your teacher desk without breaking the bank. Here’s what actually works.
Contact Paper Desktop Refresh
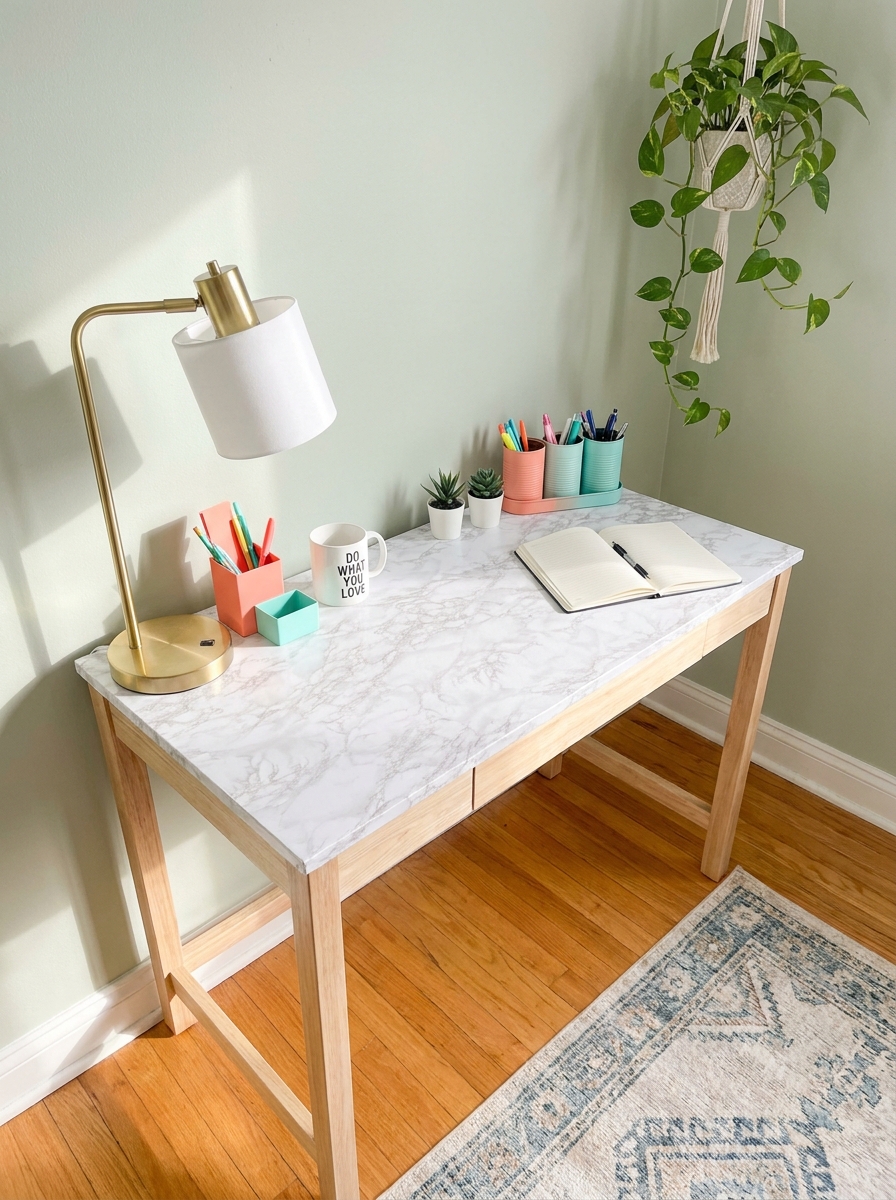
Contact paper is the secret weapon you didn’t know you needed. For under $15, you can completely transform the surface of your desk with marble, wood grain, or even fun geometric patterns. It sticks right on, peels off clean when you’re ready for a change, and hides all those coffee rings and pen marks that have been haunting you for years. The trick is to measure twice and apply slowly. Start from one edge and smooth as you go, pushing out air bubbles with a credit card. I love using marble contact paper because it instantly makes any cheap desk look expensive and professional. But if you want something playful, there are tons of colorful patterns that add personality without looking childish. This is honestly the fastest way to make your desk look brand new. And when you get tired of it? Just peel it off and try something else. It’s like having a new desk every school year, and your bank account won’t even notice.
Pro Tip: Apply contact paper in a cool room — heat makes it too stretchy and harder to position perfectly without wrinkles.
Spray Paint Makeover Magic
Got an old metal desk or filing cabinet that’s seen better days? One can of spray paint costs about $5 and can completely change the vibe. I’m obsessed with matte finishes right now — they look modern and hide imperfections way better than glossy. You’ll want to clean everything really well first, maybe give it a light sand if the surface is super smooth. Then take it outside, do thin coats, and be patient. Multiple thin layers always look better than one thick goopy coat that drips everywhere. And don’t skip the primer if you’re going light over dark — trust me on this. The color you choose changes everything. Navy or forest green feels sophisticated and calm. Bright yellow or coral adds energy and creativity. Even basic black can make a tired desk look sleek and intentional. This is the makeover that gets the most compliments because it looks like you bought a whole new desk.
Pro Tip: Spray paint in the early morning or evening when it’s cooler — midday heat makes the paint dry too fast and get bumpy.
Dollar Store Drawer Organizer System
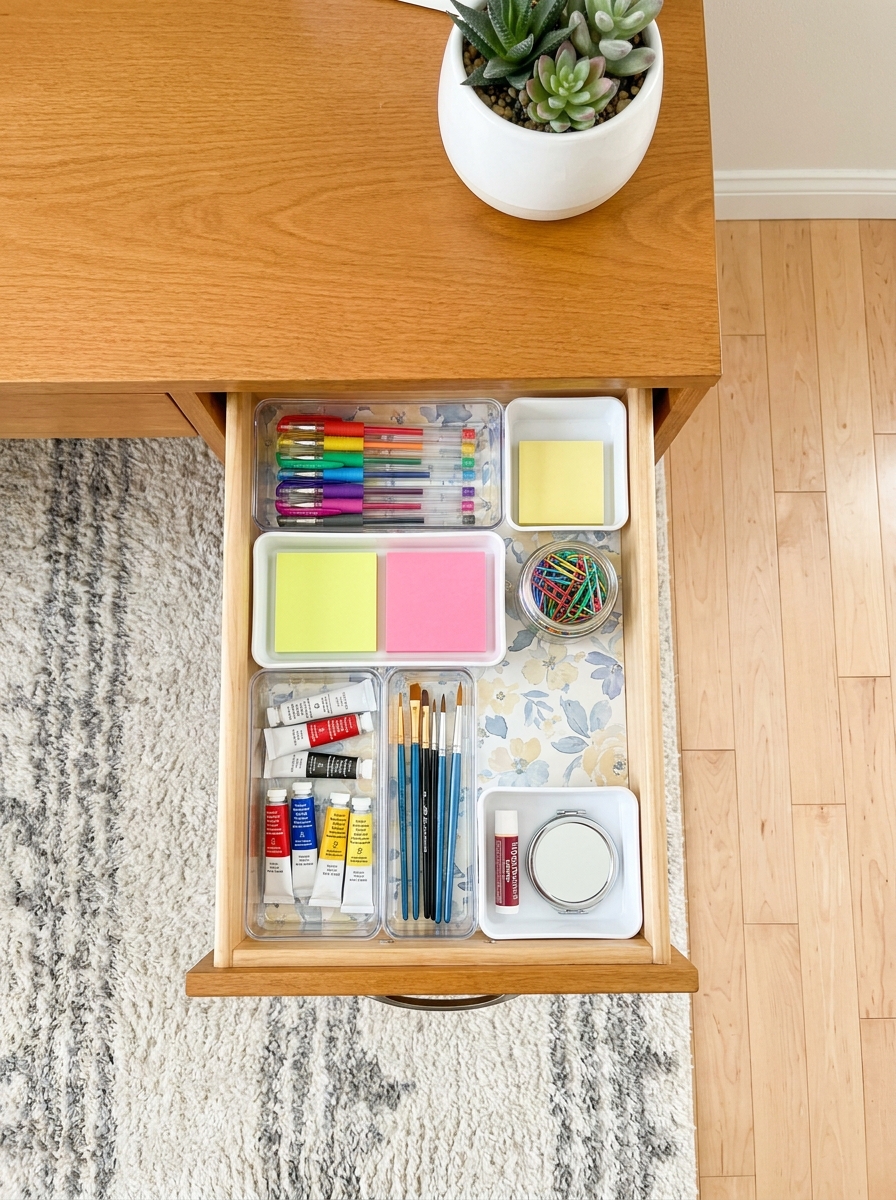
Your desk drawers are probably a hot mess of random pens, paper clips, and who knows what else. But you can fix that for literally $10 at the dollar store. Grab a bunch of small plastic bins, trays, or even cute baskets, and suddenly everything has a home. I like using different sizes to create zones — one for writing tools, one for sticky notes, one for personal stuff like lip balm and hair ties. You can even spray paint the plastic organizers to match your desk if you’re feeling extra. The key is to actually assign a purpose to each container so you’re not just shoving stuff randomly. This makeover doesn’t look dramatic in photos, but it changes your whole day. When you can find what you need in three seconds instead of digging through chaos, your desk instantly feels more professional and put-together. Plus, it’s so satisfying to open a drawer and see everything neatly organized.
Pro Tip: Line your drawers with pretty shelf liner or wrapping paper first — it makes even dollar store organizers look expensive.
Thrift Store Lamp Upgrade
Lighting makes or breaks a workspace, but new lamps are stupidly expensive. Hit up your local thrift store instead. You can find perfectly good desk lamps for $3-8, and even if they’re ugly, a little spray paint or a new lampshade fixes everything. I found a brass lamp that was covered in tarnish for $4, and after a quick polish with some vinegar and salt, it looked like a $60 West Elm piece. Or grab any basic lamp and swap the shade for something fun from a discount store. Suddenly you’ve got task lighting that actually matches your style. The right lamp doesn’t just help you see better — it sets the whole mood of your desk area. Warm light makes the space feel cozy and inviting. And when your desk looks good, you actually want to sit there and get work done. That’s worth way more than $8.
Pro Tip: Test thrift store lamps before you buy by asking to plug them in — some stores have outlets near the register for exactly this reason.
DIY Fabric Bulletin Board Transformation
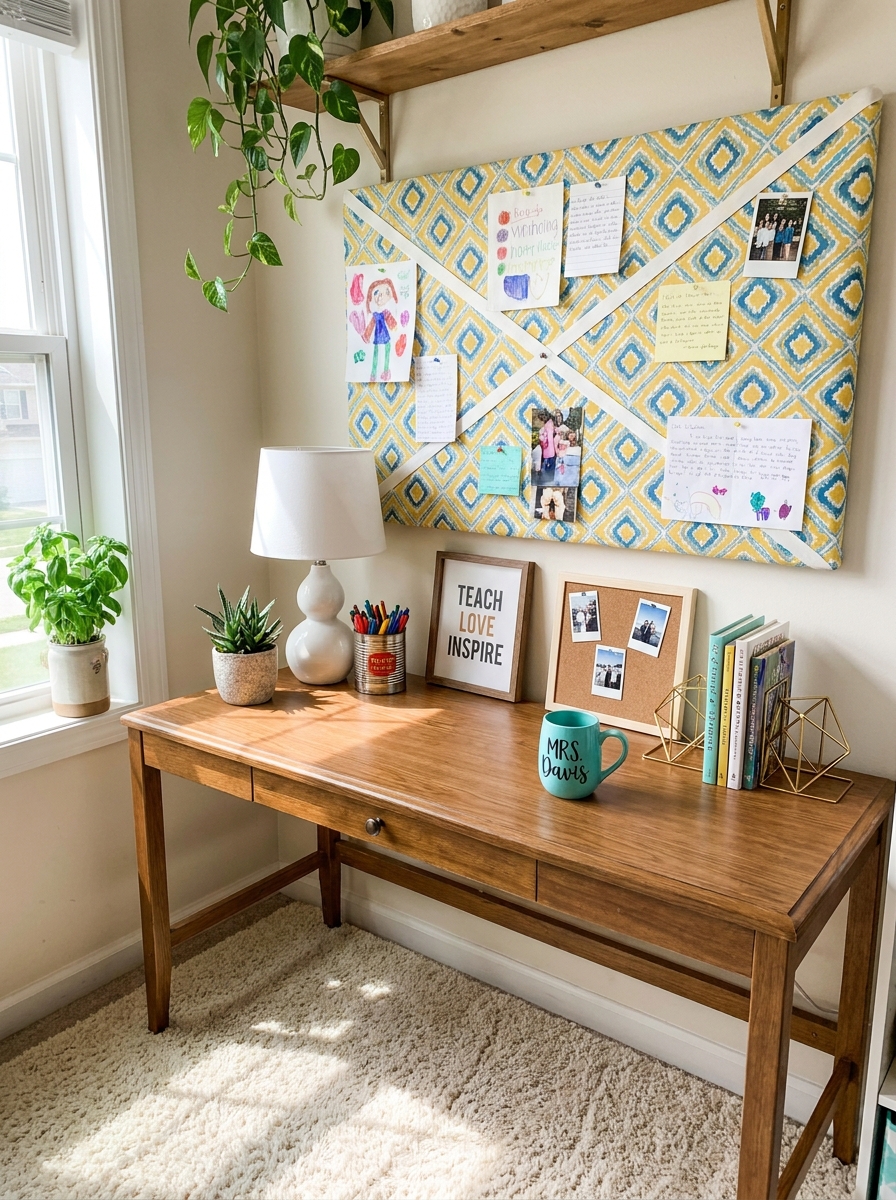
You know that sad, boring bulletin board hanging above your desk? Let’s turn it into something you actually want to look at. Grab some fun fabric from the clearance bin — I’m talking bold patterns, quirky prints, whatever makes you smile. A yard costs around $5, and you’ll have plenty left over. Stretch that fabric over your old bulletin board and staple it to the back. Boom. Instant personality. I did mine with a bright geometric print and it completely changed the vibe of my whole desk area. Now pinning up student work and reminders feels like decorating, not just organizing. The best part? You can layer ribbon in a crisscross pattern over the fabric to create little pockets for cards and notes. Use coordinating ribbon or go wild with contrasting colors. Hot glue or small tacks hold everything in place. Total cost for fabric, ribbon, and supplies? About $12. And you get a custom piece that looks like you spent way more.
Pro Tip: Choose a fabric pattern that complements your desk accessories. If your desk has lots of solid colors, go bold with the fabric. If you already have colorful stuff everywhere, pick something more neutral to balance it out.
Washi Tape Edge Detailing
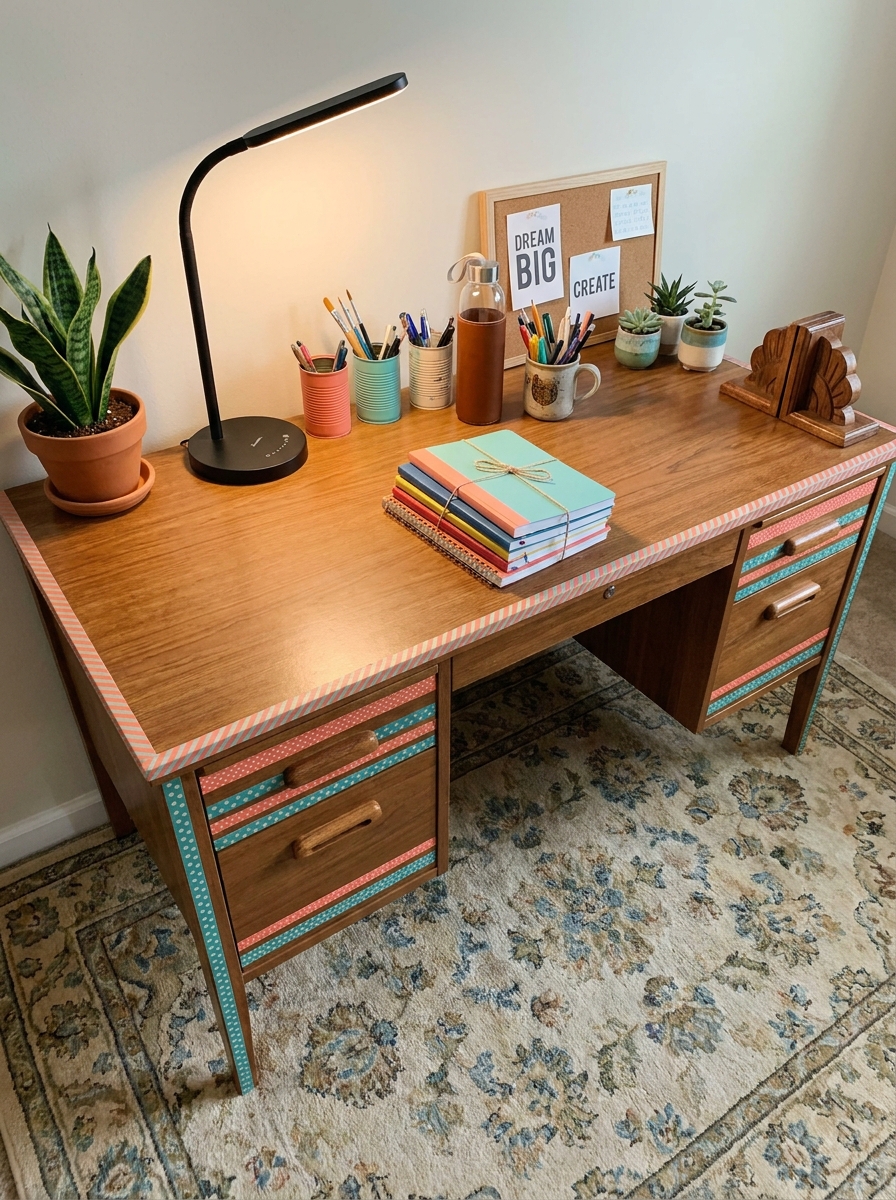
Here’s a secret weapon that costs almost nothing but makes everything look intentional: washi tape. I’m obsessed with using it to add little pops of color and pattern to boring desk edges, drawer fronts, and even the legs of my desk. It’s like jewelry for furniture. You can find rolls at the dollar store or craft stores for $1-3 each. Pick up three or four different patterns that go together — maybe stripes, polka dots, and a solid color. Run strips along the edges of your desk drawers, create a border around the desktop edge, or wrap it around the desk legs in a candy-cane stripe. It peels off easily, so you’re not committing forever. I love how you can change it up with the seasons or whenever you get bored. Last month I had mint green and gold. This month? Coral and navy. It takes maybe 20 minutes and costs under $8, but it makes your desk look completely custom and thoughtfully designed.
Pro Tip: Before applying washi tape to any surface, wipe it down with rubbing alcohol and let it dry completely. The tape sticks better and lasts longer without peeling at the corners.
Peel and Stick Wallpaper Accent Wall
Want to make your desk area feel like its own special zone? Create a mini accent wall behind it with peel and stick wallpaper. You don’t need to cover a whole wall — just a section behind your desk makes a huge impact. I found a roll of gorgeous brick-pattern wallpaper at HomeGoods for $15. Measure the space behind your desk and cut your wallpaper to fit just that area. It’s like giving your desk its own little stage. The contrast between the accent wall and the rest of the room makes your workspace feel more defined and important. Plus, it photographs beautifully if you ever want to share your setup. You can find removable wallpaper in every pattern imaginable — wood grain, marble, florals, geometric shapes. I’ve seen teachers do chalkboard-print wallpaper, subway tile looks, even world maps. The adhesive is renter-friendly, so it peels right off when you’re ready for a change. Total game-changer for under $20.
Pro Tip: Start from the center and work your way out to avoid bubbles. Use a credit card or squeegee to smooth as you go, and don’t worry about perfection — small wrinkles add character and won’t show in photos.
Hardware Swap for Instant Upgrade

This is the easiest trick that nobody talks about enough. Swapping out old drawer pulls and knobs takes five minutes and makes your desk look like a completely different piece of furniture. I’m not exaggerating — it’s wild how much this changes things. Head to the hardware store clearance section or check out HomeGoods, TJ Maxx, or even Amazon. You can find gorgeous knobs for $2-4 each. I love mixing metals — like brass knobs on one drawer and matte black on another — for an eclectic collected look. Or go matchy-matchy with all the same style. Both work. Most drawer pulls attach with a simple screw from the inside. You literally just unscrew the old one and screw in the new one. No power tools needed. I changed out six drawer pulls on my desk in less than ten minutes, and suddenly my beat-up desk looked boutique. Spent $18 total and felt like I bought new furniture.
Pro Tip: Bring one of your old knobs to the hardware store to make sure you’re buying the right size and screw length. Some knobs need longer screws if your drawer fronts are thick, and it’s annoying to get home and realize they don’t fit.
Fabric Skirt for Hidden Storage
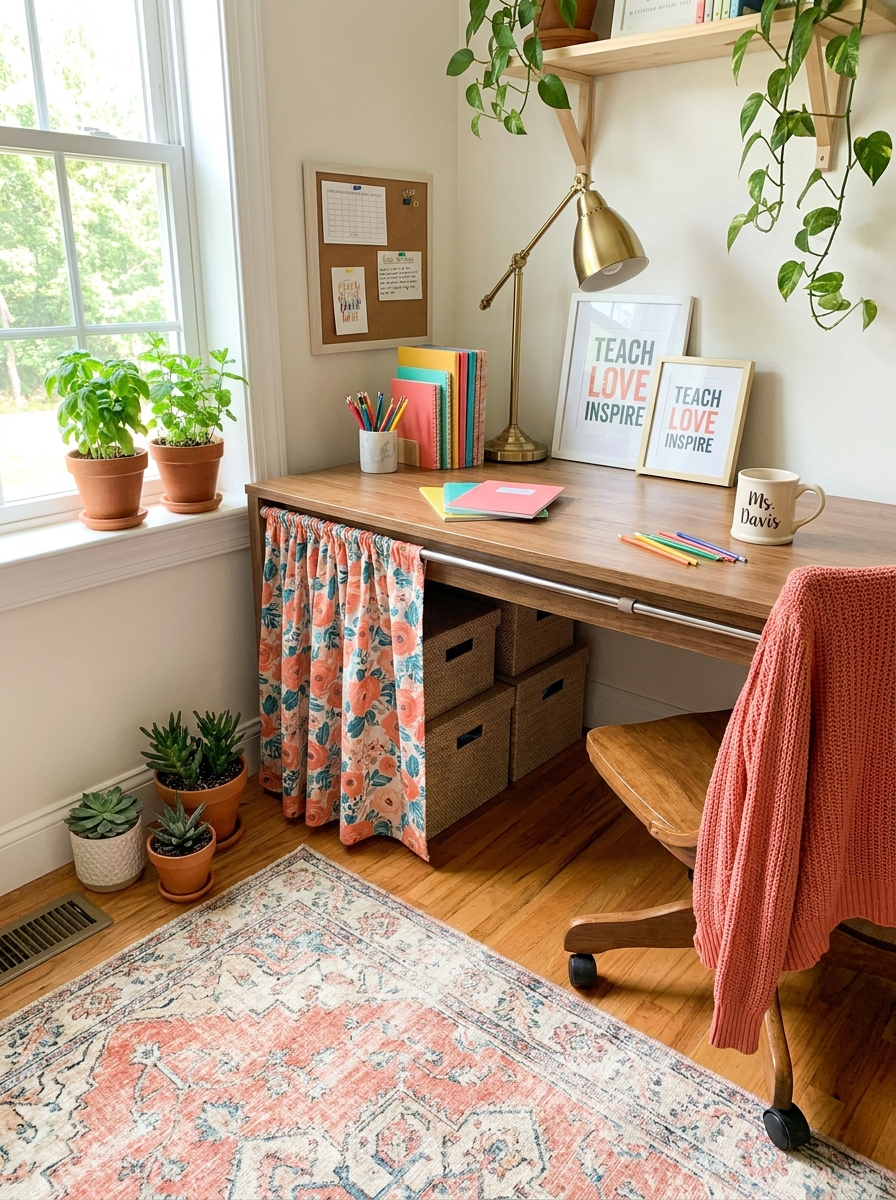
You know what drives me crazy? Looking at all the junk stored under my desk. Old boxes, random supplies, that tangle of cords I swear I’ll organize someday. A fabric skirt completely changes the game and costs almost nothing. Grab a tension rod and some fabric from the clearance bin — I’m talking $10 tops. Measure the front and sides of your desk, cut the fabric (no sewing needed if you use pinking shears), and clip it to the tension rod with binder clips or curtain rings. Done in twenty minutes. I used a cheerful striped fabric and suddenly my messy storage looked intentional. The best part? You can switch out the fabric seasonally. Fall plaid, spring florals, whatever makes you happy. Plus, it softens the whole desk area and makes the space feel more like a cozy reading nook than a boring workspace. My students always comment on how “homey” it looks, and I smile knowing what chaos is hiding behind that pretty curtain.
Pro Tip: Use fabric remnants from the quilting section — they’re already the perfect width and come in amazing patterns for just a few dollars per yard.
Painted Desk Legs Color Pop
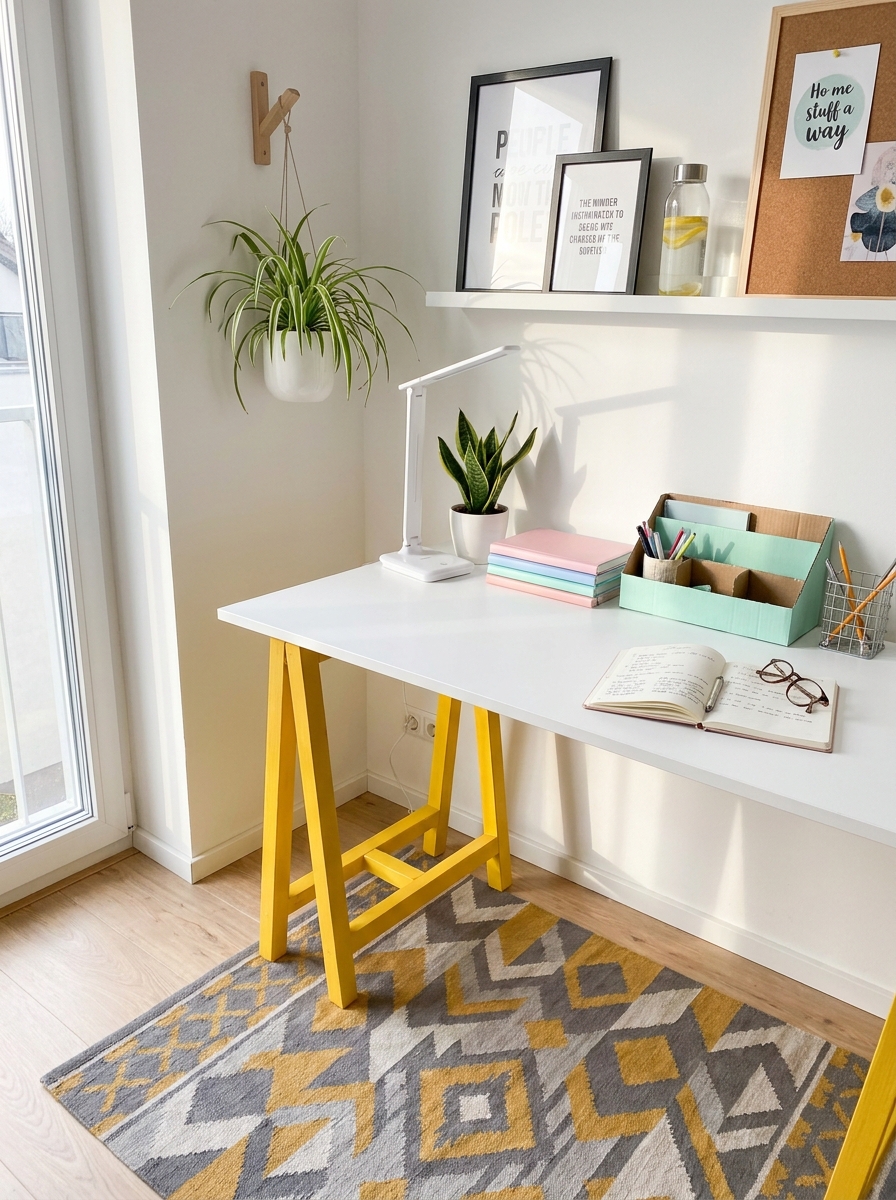
Here’s a secret weapon most people miss — desk legs. We spend so much time worrying about the desktop that we forget the legs are basically free real estate for personality. I grabbed a can of bright yellow spray paint for $5 and transformed my boring metal desk legs in an afternoon. Suddenly my whole workspace felt cheerful and modern. You can go bold with a single bright color, do an ombre effect from dark to light, or even paint each leg a different color for a playful vibe. The trick is good prep work — clean those legs with rubbing alcohol, tape off anything you don’t want painted, and do thin coats. I did mine outside on a sunny Saturday and let each coat dry completely. By Sunday morning, I had a completely different desk. My coworker did hers in coral and navy stripes using painter’s tape, and it looks like a West Elm piece. For under $10 and minimal effort, you get maximum impact.
Pro Tip: Use metallic spray paint like copper or gold on metal legs for an expensive-looking finish that catches the light beautifully throughout the day.
Rope Wrapped Desk Edges
I discovered this trick after my desk edge started looking beat up from years of bag bumps and coffee cup rings. Instead of replacing the whole desk, I wrapped the edges in rope and now it looks like a custom piece. You need sisal rope from the hardware store (about $8 for 50 feet), hot glue, and patience. Start at one corner and work your way around, gluing as you go. Keep the rope tight and push each row snugly against the last one. It takes maybe two hours for an average desk, but you can do it while binge-watching your favorite show. The texture adds so much warmth and hides all those little dings and scratches. I did mine in natural sisal, but you can find dyed rope in fun colors too. One teacher friend used navy rope on her white desk and it’s absolutely stunning. The best part? It’s practically indestructible, so you’re protecting your desk from future damage while making it gorgeous.
Pro Tip: Wrap just the front edge if you’re short on time — that’s what people see most, and it still makes a huge visual impact for minimal effort.
Clipboards as Wall-Mounted Organization

This might be my favorite cheap trick ever. I bought six wooden clipboards from the dollar store for $6 total, spray painted them in coordinating colors, and mounted them on the wall above my desk. Instant organization that looks intentional and artistic. Each clipboard holds something different — one for my weekly schedule, one for important reminders, one for student work I’m grading, one for inspirational quotes I rotate monthly. The best part is how easy it is to swap things out. No pinning, no tape residue, just clip and go. I arranged mine in a grid pattern, but you could do a scattered gallery wall look or even a straight line. The pop of color against my wall makes the whole desk area feel pulled together. Plus, when parents or administrators walk by, everything looks organized even when I’m drowning in paperwork. It’s functional art that costs basically nothing and saves you from that messy bulletin board look we all know too well.
Pro Tip: Paint the clipboard clips in metallic colors like rose gold or bronze — it’s a tiny detail that makes them look way more expensive than a dollar each.
Chalkboard Paint Desktop for Creative Planning
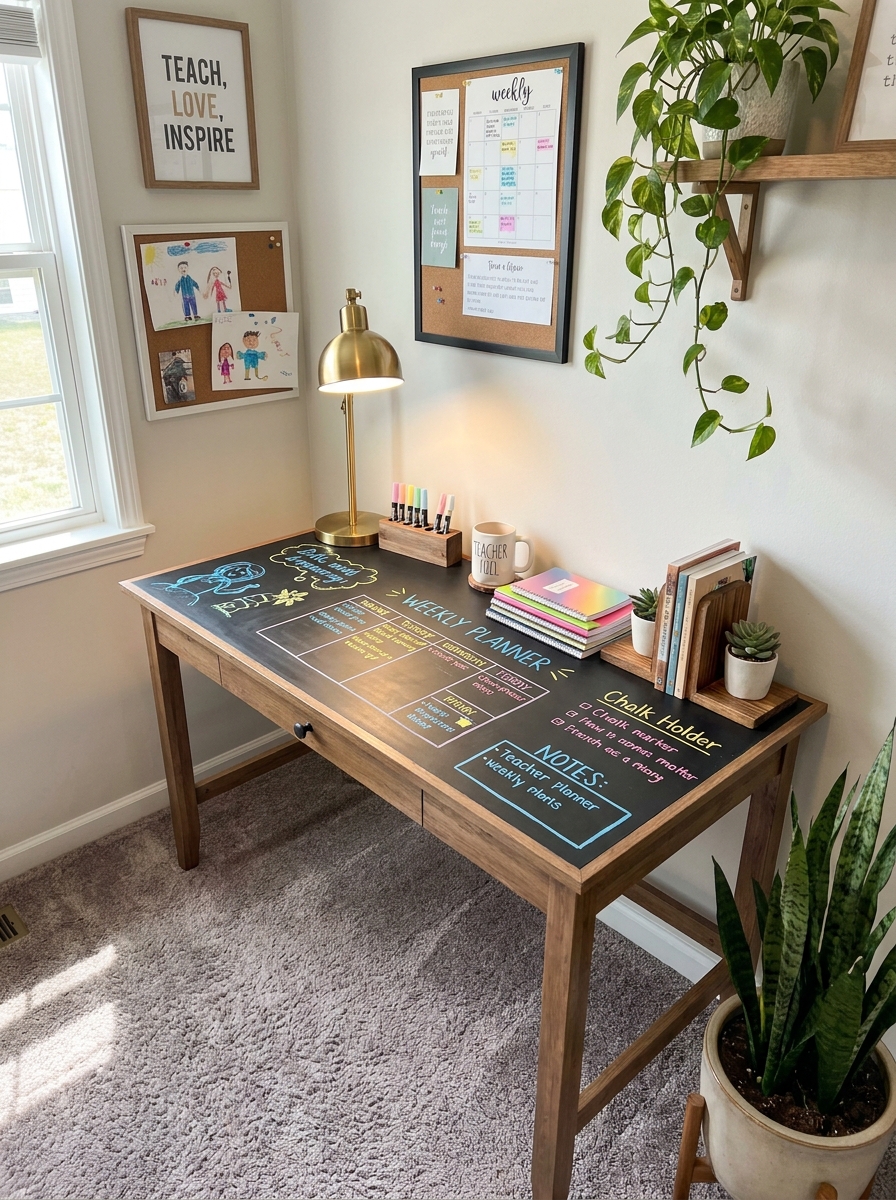
Here’s something genius that’ll change how you use your desk — chalkboard paint! Grab a can for about $8, tape off your desktop surface, and give it a couple coats. Suddenly you’ve got a built-in planner, doodle space, and to-do list all in one. I love this because it’s functional AND fun. The best part? You can write directly on your desk with chalk or chalk markers. Sketch out lesson plans, jot down reminders, or let students leave you little messages. It wipes clean in seconds, so you’re never stuck with permanent marks. Plus, it looks incredibly cool in that modern teacher aesthetic way. This works especially well if you have an old desk with a surface that’s seen better days. Instead of trying to refinish it perfectly, just embrace the chalkboard vibe. You can even do just a section of your desk if you want to keep some regular workspace. Add a little wooden tray nearby to hold your chalk, and you’ve created the most interactive desk ever for under fifteen bucks.
Pro Tip: Use chalk markers instead of regular chalk for brighter colors and less dust — they wipe off with a damp cloth and won’t leave that powdery mess all over your papers.
Quick Guide
## Quick Budget Breakdown: Where to Spend Your $30 Here’s how to prioritize if you’re starting from scratch: **Must-Have ($15-20):** Contact paper or spray paint for the main desk surface — this gives you the biggest visual impact. **Worth It ($5-8):** One statement piece like a thrift store lamp or a fun organizer that makes you smile. **Nice Touch ($5-7):** Dollar store drawer organizers or small decor items like a plant or picture frame. **Save for Later:** Expensive storage systems or brand-new accessories. You can always add these later when you find deals. The trick is to focus on one big transformation and a few small touches. You don’t need to do everything at once. Start with what bothers you most about your current desk, fix that, and build from there. Your $30 will go way further when you’re strategic about it.
Your Desk, Your Way — On Your Budget
Here’s the thing about teacher desk makeovers — they’re not really about the desk at all. They’re about creating a space that makes you feel good when you show up to work. A space that feels like yours, not just some generic furniture your school provided ten years ago. And you don’t need a big budget to make that happen. With these 13 ideas, you’ve got everything you need to transform your workspace for under $30. Whether you go all-in with contact paper and spray paint, or just start with some dollar store organizers and a thrift store lamp, every little change adds up. The best part? None of these makeovers are permanent. You can change your mind next month, try a new color next year, or swap things out when you get bored. Your desk should grow with you, and when you’re spending this little, you can afford to experiment. So grab that can of spray paint, hit up the dollar store, and give your teacher desk the glow-up it deserves. You’ve got this.
Frequently Asked Questions
What’s the fastest teacher desk makeover I can do in under an hour?
Contact paper is your best bet. You can cover a desk surface in 30-45 minutes, and it makes an instant dramatic difference. Just measure, cut, and smooth it on. No drying time, no mess, and you’re done before lunch.
How do I makeover a teacher desk without damaging school property?
Stick to removable solutions like contact paper, desk organizers, and decorative accessories you can take with you. Avoid spray painting school-owned furniture. If you want color, use removable vinyl decals or a desk pad instead.
Where can I find cheap desk makeover supplies on a teacher budget?
Dollar stores, thrift shops, and discount retailers like Five Below are goldmines. Also check Facebook Marketplace and garage sales for lamps and organizers. Contact paper and spray paint are cheapest at big box hardware stores when they’re on sale.
Can I really makeover a teacher desk for under $30?
Absolutely. Contact paper runs $10-15, spray paint is $5-7 per can, and dollar store organizers are literally $1-3 each. If you shop smart and prioritize the changes that matter most, $30 goes surprisingly far.
What’s the best color to paint a teacher desk for a professional look?
Navy blue, forest green, or charcoal gray all look sophisticated and hide wear better than lighter colors. If you want something brighter, try sage green or a muted coral. Avoid super bright colors that might feel overwhelming after a long school day.